Making a Traditional Net..of sorts.
-
Mark
- Head Bailiff
- Posts: 21197
- Joined: Mon Aug 22, 2011 4:55 pm
- 12
- Location: Leicestershire
- Contact:
Re: Making a Traditional Net..of sorts.
Now that is stunning, what marvellous workmanship, first class as always wm+. 

Mark (Administrator)
The most precious places in the English landscape are those secretive corners,
where you find only elder trees, nettles and dreams. (BB - Denys Watkins-Pitchford).
The most precious places in the English landscape are those secretive corners,
where you find only elder trees, nettles and dreams. (BB - Denys Watkins-Pitchford).
-
Marc

- Sea Trout
- Posts: 4011
- Joined: Sun Mar 10, 2013 11:14 am
- 11
- Location: Co Durham, land of the prince bishops
Re: Making a Traditional Net..of sorts.
If a landing net can be beautiful then that one is at the top of the list. Can't wait to see the finished article.
Marc. (Prince of Durham)
“A life that partakes even a little of friendship, love, irony, humor, parenthood, literature, and music, and the chance to take part in battles for the liberation of others cannot be called 'meaningless'...”
“A life that partakes even a little of friendship, love, irony, humor, parenthood, literature, and music, and the chance to take part in battles for the liberation of others cannot be called 'meaningless'...”
-
Snape

- Bailiff
- Posts: 9984
- Joined: Sun Sep 04, 2011 11:52 am
- 12
- Location: North Oxfordshire
- Contact:
Re: Making a Traditional Net..of sorts.
What a fascinating project WM+. Once again your skills are breathtaking.
The spreader block is a real thing of beauty.
Well done.
The spreader block is a real thing of beauty.
Well done.
“Fishing is much more than fish. It is the great occasion when we may return to the fine simplicity of our forefathers,” Herbert Hoover.
`·.¸¸.·´¯`·.¸¸.·´¯`·.¸ ><((((º>
`·.¸¸.·´¯`·.¸¸.·´¯`·.¸ ><((((º>
-
Wallys-Cast

- Pike
- Posts: 6625
- Joined: Tue Mar 20, 2012 11:02 am
- 12
- Location: Durham.
Re: Making a Traditional Net..of sorts.
Totally Gobsmacked......
Wal.
Wal.
-
Richard C

- Brown Trout
- Posts: 1413
- Joined: Sun Mar 25, 2012 11:59 am
- 12
- Location: East Sussex
Re: Making a Traditional Net..of sorts.
Craftmanship of the very highest order. Outstanding work again WM+
"We shall not cease from exploration. And the end of all our exploring will be to arrive where we started and know the place for the first time.".
T. S Eliot
http://richard-cleaver.blogspot.co.uk/
T. S Eliot
http://richard-cleaver.blogspot.co.uk/
-
Hovis

- Tench
- Posts: 2528
- Joined: Tue Apr 02, 2013 1:54 pm
- 11
- Location: Nottingham
Re: Making a Traditional Net..of sorts.
Super stuff watermole and good to know even you have a scrap bin for when things go wrong!
I have laid aside business, and gone a'fishing.
Izaak Walton
Izaak Walton
-
CrayCane

- Chub
- Posts: 1018
- Joined: Sun Apr 08, 2012 2:43 pm
- 12
- Location: Bexley, Kent
Re: Making a Traditional Net..of sorts.
Beautiful! Your skill and attention to detail are inspiring.
Pete
Pete
-
MGs

- Pike
- Posts: 6423
- Joined: Wed Nov 02, 2011 2:24 pm
- 12
- Location: Cornwall
Re: Making a Traditional Net..of sorts.
It looks fantastic. All of the small details go together to make a thing of beauty.
Old car owners never die....they just rust away
-
Watermole+

- Chub
- Posts: 1057
- Joined: Thu Mar 15, 2012 11:07 pm
- 12
- Location: Devon & Cornwall border
Re: Making a Traditional Net..of sorts.
Part 6. Net completed!
..at long last, everything finished and ready to use.
The final tasks were to finish turning the greenheart handle and make the ferrules which join everything together.
I had previously roughly turned the handle sections and allowed them to dry out a little before finish turning. This was quite a job to do as the lathe has only a very limited capacity. I would have liked to have made the handle as one piece but this was impossible so it was made as two, being joined together by both close-fitting ferrule and 3/8" BSF thread in the centre.
It actually ended up a bit better this way, since both sections are of differing lengths, I have the option of either a 4' handle or one with a reach of over 7'-which might be a big advantage..
In order to turn a long length, the tailstock was removed and the fixed steady set as far to the rear as possible. I turned as much as I could, constantly adjusting everything to get maximum reach, then reversed the wood and picked up where the last cut ended, with a lot of sanding down after to 'blend in'..
This will give you some idea of what was involved.
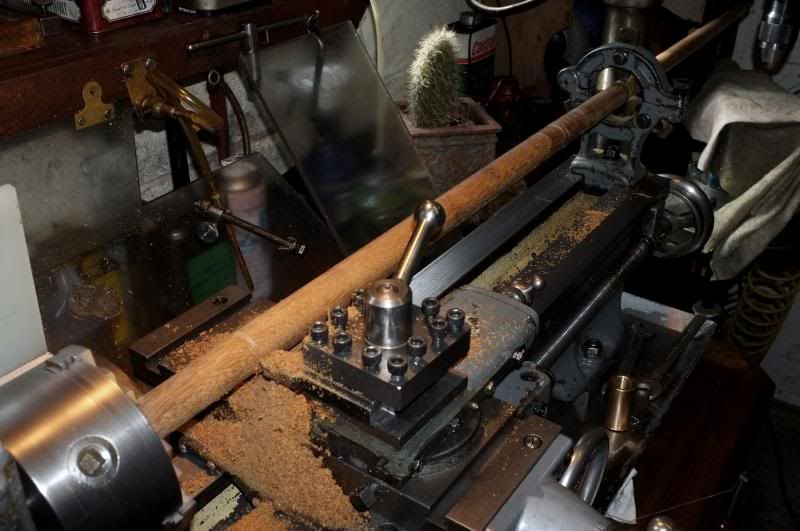
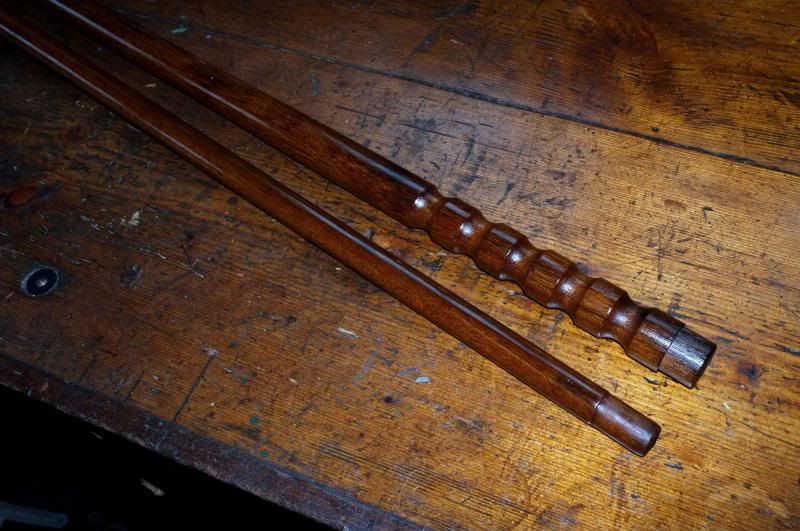
It took a long time but we ended up with a 2-piece handle tapering continuously from 1" down to 5/8" over 7'.
The 'steps' were then turned for the ferrules to fit over and some grooves for extra grip put in on the end.
When everything was sanded down, I gave both parts a thorough treatment with raw linseed oil, rubbing down vigorously between coats and finishing with Deck oil, then polishing up until dry.
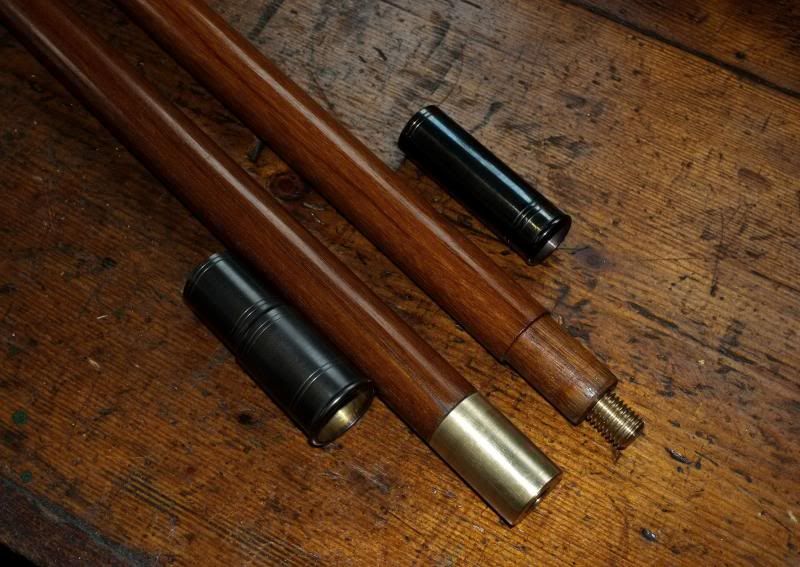
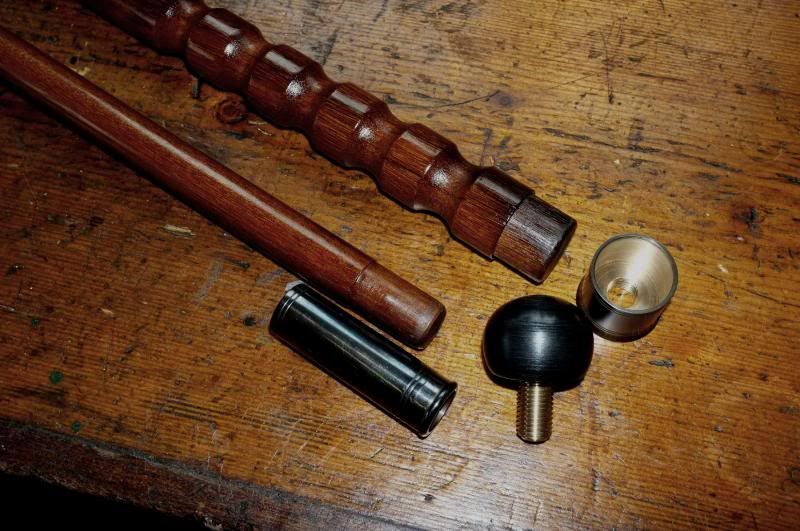
Next, I made the ferrules for 1. joining the net frame to the top part of the handle and 2. to join both parts of the handle.
The top one was made from an odd piece of nickel but the remaining ones from brass.. After degreasing, I chemi-blacked all of them except the male part of the join. The nickel came out a bit blue-ish, more so than the brass..
This is how a one of the female ferrules was made:-
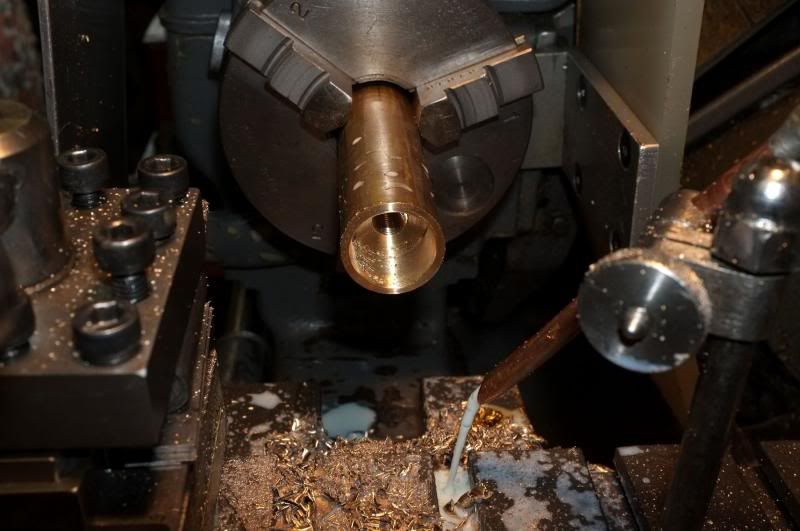
Firstly, a billet of 1" diameter brass was loaded into the chuck..

..then,it was faced off, drilled through 21/64", being the tapping size for a class 3B, 3/8" BSF thread, counter-drilled to waste away excess metal then bored to fit the male ferrule. Finally, the thread was tapped in.
It sounds complicated but it isn't really; you just work through it in a set order and the job appears in front of you!
Next, the outside diameter was finished turned..
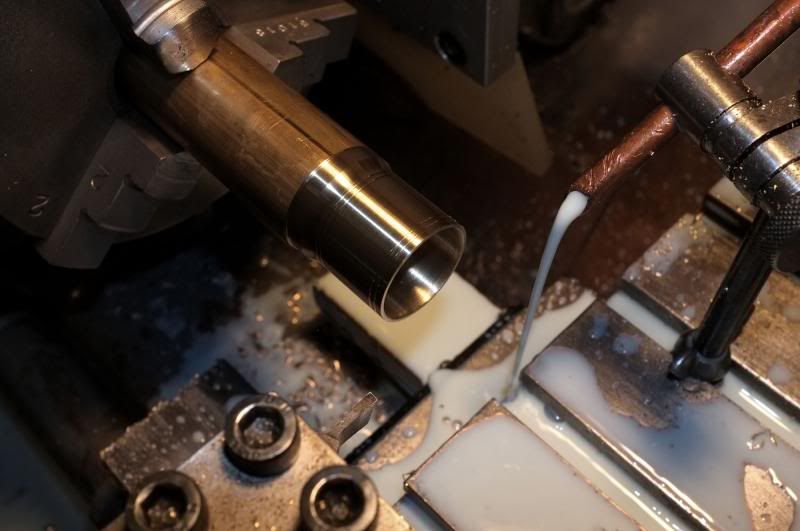
..a little blacking put on..
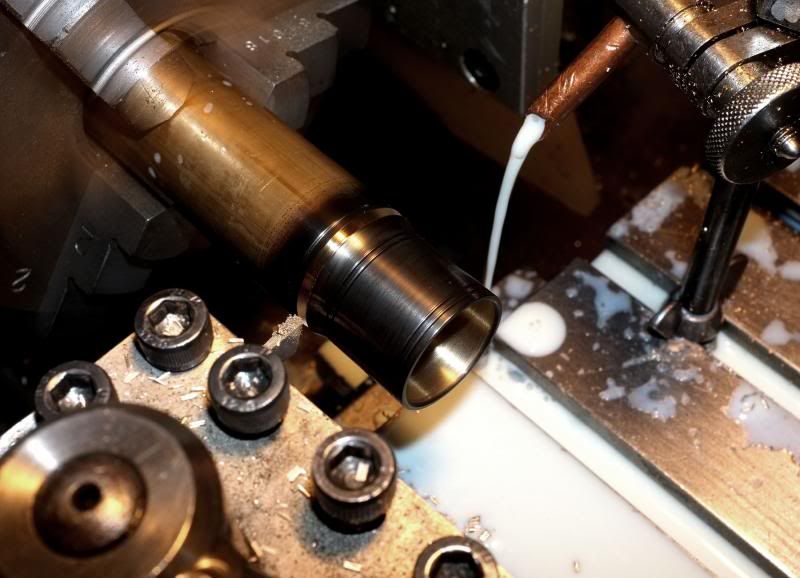
..and the job parted off.
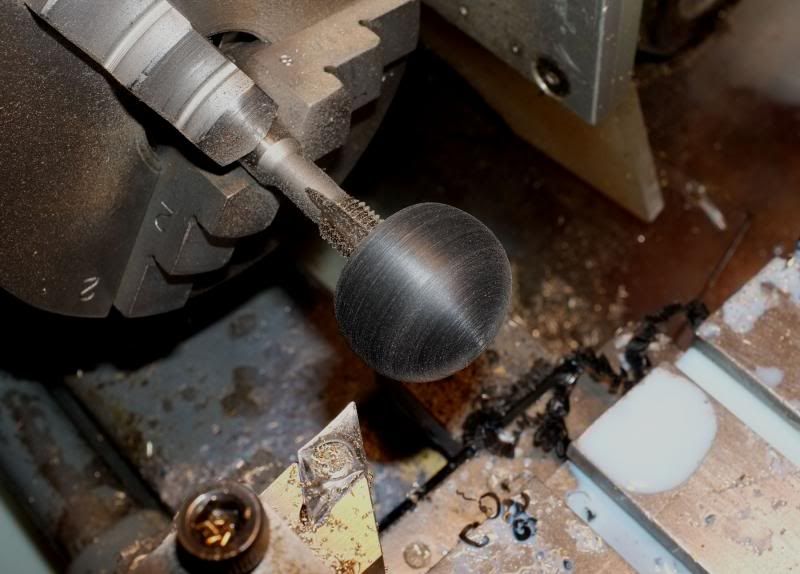
Next, we made a 'button' from a piece of black delrin by facing, drilling and tapping the thread, then reversing it and mounting it on the tap and finish shaping by freehand filing, finally finishing with emery paper.
I then made some pieces of 3/8" BSF studding from brass rod, fixing a short piece in to the button and another into the joining female ferrules.
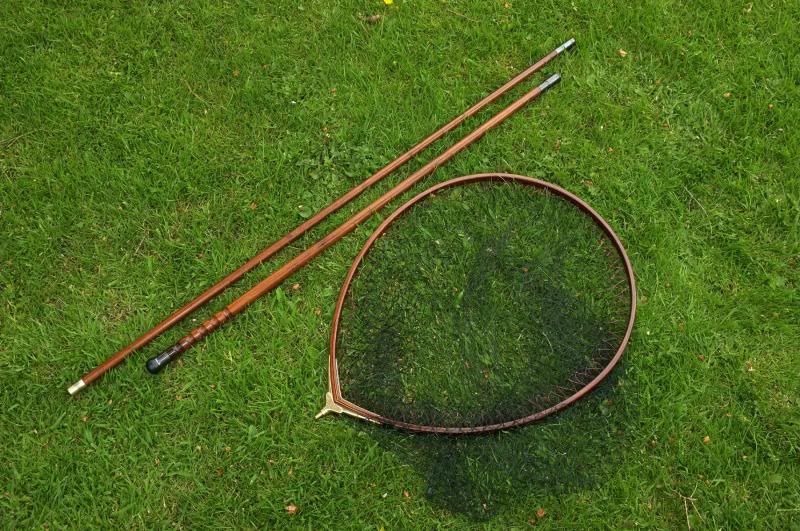
This then completed the net as such so here are a few pictures of everything.
It's obviously a bit weightier than a bamboo handle but to me, weight in a landing net is not going to be an issue. You don't have to carry it far and it's only in use for a few brief moments at a time when landing a fish!
Hope you like this as much as I have enjoyed making it......and looking forward to the new season when we can try it out!
With both handle parts joined together, ready for use..
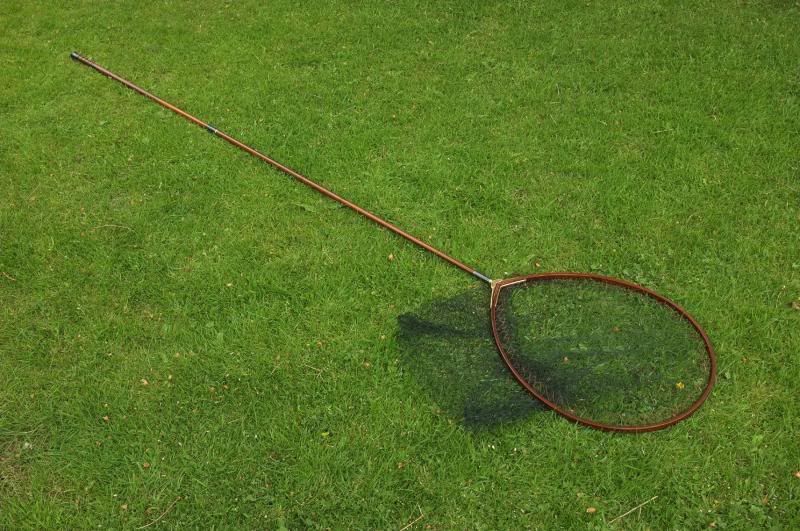
The screw joint fitting..
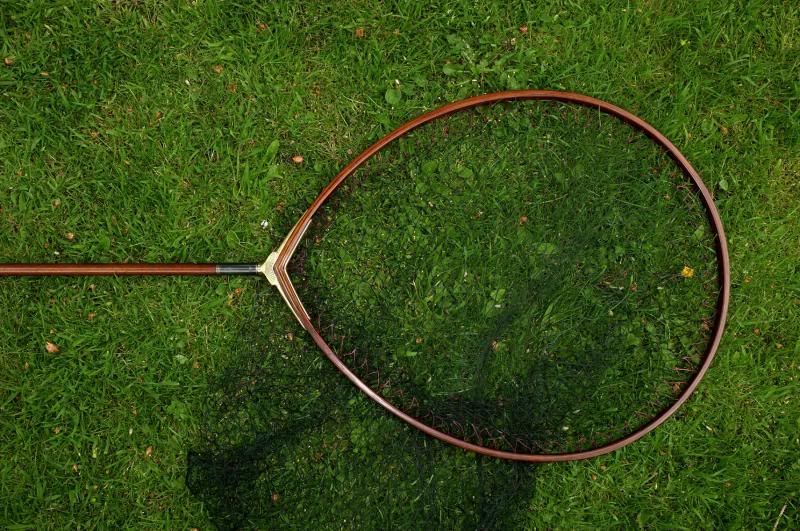
The net complete.
Regards to all,
wm+
..at long last, everything finished and ready to use.
The final tasks were to finish turning the greenheart handle and make the ferrules which join everything together.
I had previously roughly turned the handle sections and allowed them to dry out a little before finish turning. This was quite a job to do as the lathe has only a very limited capacity. I would have liked to have made the handle as one piece but this was impossible so it was made as two, being joined together by both close-fitting ferrule and 3/8" BSF thread in the centre.
It actually ended up a bit better this way, since both sections are of differing lengths, I have the option of either a 4' handle or one with a reach of over 7'-which might be a big advantage..
In order to turn a long length, the tailstock was removed and the fixed steady set as far to the rear as possible. I turned as much as I could, constantly adjusting everything to get maximum reach, then reversed the wood and picked up where the last cut ended, with a lot of sanding down after to 'blend in'..
This will give you some idea of what was involved.
It took a long time but we ended up with a 2-piece handle tapering continuously from 1" down to 5/8" over 7'.
The 'steps' were then turned for the ferrules to fit over and some grooves for extra grip put in on the end.
When everything was sanded down, I gave both parts a thorough treatment with raw linseed oil, rubbing down vigorously between coats and finishing with Deck oil, then polishing up until dry.
Next, I made the ferrules for 1. joining the net frame to the top part of the handle and 2. to join both parts of the handle.
The top one was made from an odd piece of nickel but the remaining ones from brass.. After degreasing, I chemi-blacked all of them except the male part of the join. The nickel came out a bit blue-ish, more so than the brass..
This is how a one of the female ferrules was made:-
Firstly, a billet of 1" diameter brass was loaded into the chuck..
..then,it was faced off, drilled through 21/64", being the tapping size for a class 3B, 3/8" BSF thread, counter-drilled to waste away excess metal then bored to fit the male ferrule. Finally, the thread was tapped in.
It sounds complicated but it isn't really; you just work through it in a set order and the job appears in front of you!
Next, the outside diameter was finished turned..
..a little blacking put on..
..and the job parted off.
Next, we made a 'button' from a piece of black delrin by facing, drilling and tapping the thread, then reversing it and mounting it on the tap and finish shaping by freehand filing, finally finishing with emery paper.
I then made some pieces of 3/8" BSF studding from brass rod, fixing a short piece in to the button and another into the joining female ferrules.
This then completed the net as such so here are a few pictures of everything.
It's obviously a bit weightier than a bamboo handle but to me, weight in a landing net is not going to be an issue. You don't have to carry it far and it's only in use for a few brief moments at a time when landing a fish!
Hope you like this as much as I have enjoyed making it......and looking forward to the new season when we can try it out!
With both handle parts joined together, ready for use..
The screw joint fitting..
The net complete.
Regards to all,
wm+
"Are not two sparrows sold for a farthing? Yet one of them shall not fall without your Father knoweth" ..Jesus of Nazareth, King James AV
-
Richard C
- Brown Trout
- Posts: 1413
- Joined: Sun Mar 25, 2012 11:59 am
- 12
- Location: East Sussex
Re: Making a Traditional Net..of sorts.
Simply stunning WM+. I have enjoyed following this thread and yet again I'm blown away by your skill, creative flair and ingenuity. Outstanding!
"We shall not cease from exploration. And the end of all our exploring will be to arrive where we started and know the place for the first time.".
T. S Eliot
http://richard-cleaver.blogspot.co.uk/
T. S Eliot
http://richard-cleaver.blogspot.co.uk/