The Richard Walker nets Nos. 2 & 3
-
Marc

- Sea Trout
- Posts: 4011
- Joined: Sun Mar 10, 2013 11:14 am
- 11
- Location: Co Durham, land of the prince bishops
Re: The Richard Walker nets Nos. 2 & 3
You certainly posses huge talent, WM. Also an eye for what makes handmade tackle beautiful, a winning combination. I'm looking forward with anticipation for the next instalment.
Marc. (Prince of Durham)
“A life that partakes even a little of friendship, love, irony, humor, parenthood, literature, and music, and the chance to take part in battles for the liberation of others cannot be called 'meaningless'...”
“A life that partakes even a little of friendship, love, irony, humor, parenthood, literature, and music, and the chance to take part in battles for the liberation of others cannot be called 'meaningless'...”
-
Wallys-Cast

- Pike
- Posts: 6654
- Joined: Tue Mar 20, 2012 11:02 am
- 12
- Location: Durham.
Re: The Richard Walker nets Nos. 2 & 3
Absolutely amazing engineering skill and attention to detail. 
Wal.
Wal.
-
Northern_Nomad

- Arctic Char
- Posts: 1674
- Joined: Wed Nov 27, 2013 8:10 pm
- 10
- Location: Wales
Re: The Richard Walker nets Nos. 2 & 3
Absolutely superb as ever
"We knelt side by side looking at it. I knew it was big, and suddenly it dawned on me it was more than that. It was tremendous!" - Richard Walker
-
Mick

- Chub
- Posts: 1014
- Joined: Wed Apr 22, 2015 9:10 am
- 9
- Location: Buckinghamshire
-
Barbulus

- Tench
- Posts: 2510
- Joined: Sun Aug 25, 2013 1:51 pm
- 10
Re: The Richard Walker nets Nos. 2 & 3
That is superb; what skill. Absolutely delightful reading this thread. "Hat off" to you. I am in awe.
-
Watermole+

- Chub
- Posts: 1058
- Joined: Thu Mar 15, 2012 11:07 pm
- 12
- Location: Devon & Cornwall border
Re: The Richard Walker nets Nos. 2 & 3
..Yet again, I have to apologize for such a long delay between posts.
Because of personal circumstances, this has to be done as-and-when possible, but I promise you, it will be eventually completed!
Anyway, inspired by Northern Nomad, since last time I have acquired a new (to me) attachment for the little Myford, a vertical slide for small milling and drilling tasks. It is not the answer to everything, but will greatly assist in doing many of the jobs that I have hitherto been struggling with..
A said, It will not do everything however, and I still prefer the lathe 4-jaw chick for some of the work, as you will see..
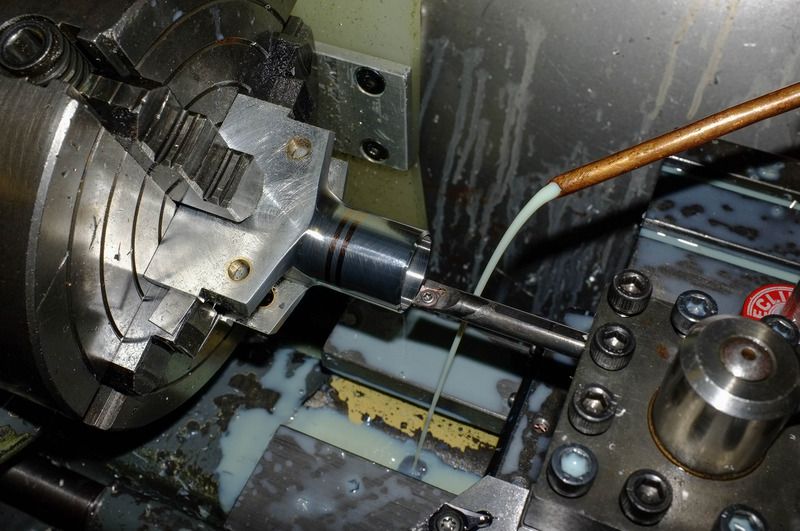
I think that last time, one of the hinge blocks was in rectangular form with the holes for the hinge pins bored through and the little bushes shrink-fitted in place. The next step is to take the block down to correct thickness on both sides, using the lathe like this..
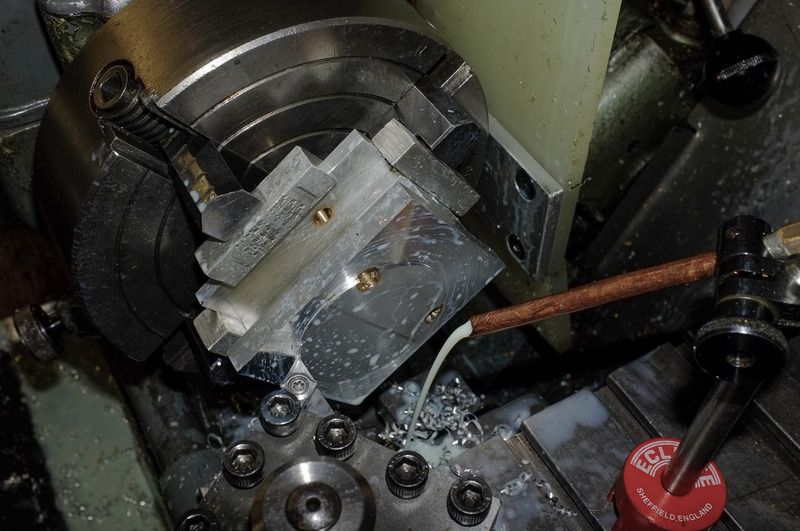
When that was done, the block was repositioned, carefully clocked up true on all faces and, using a centre in the tailstock for support, started roughing away the surplus material at the ferrule end.
The next step is to drill through 25/64" for the attachment screw..
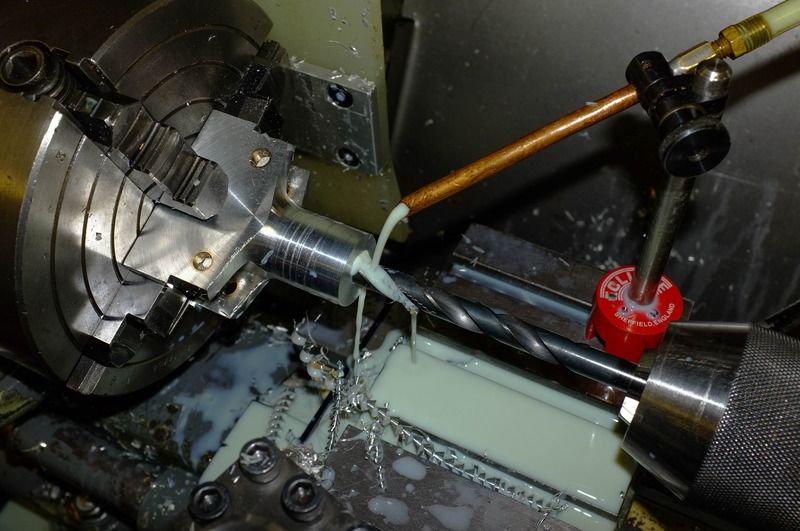
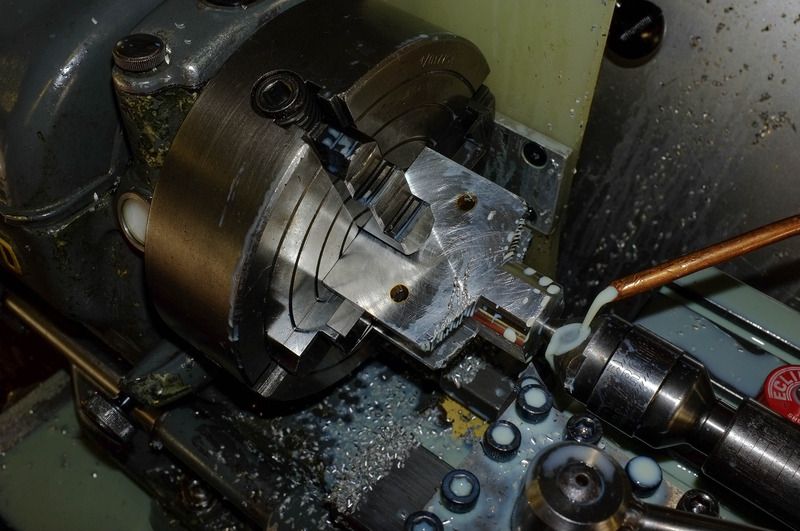
Now I am taking away excess material from where the ferrule will locate, using a 20mm 'Blacksmiths' drill. These are larger drills with a 1/2" shank for use in a conventional drill chuck, but not for accurate work, only roughing out.
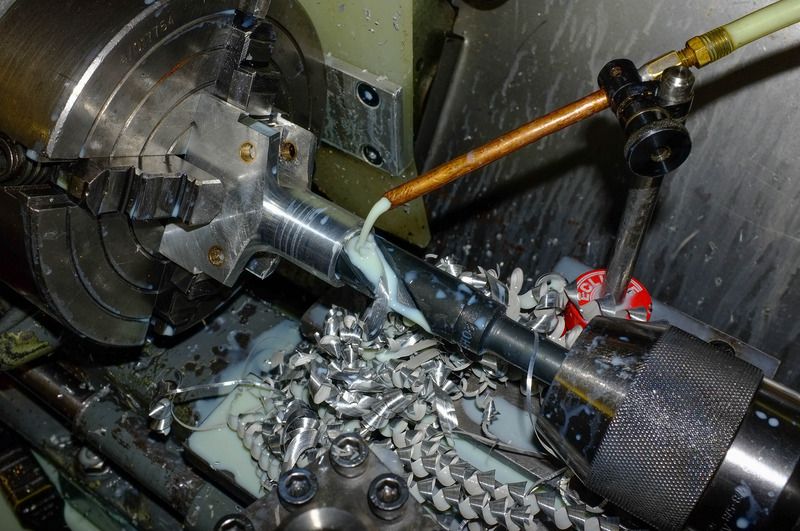
This end of the block can now be finished. The outside diameter is done and some decoration added. I am now boring out the ferrule location to size and depth. The little boring bar is also a new addition-a present to myself I am rather proud of, although a bit expensive! It is solid carbide with changeable inserts..very sharp and absolutely rigid!
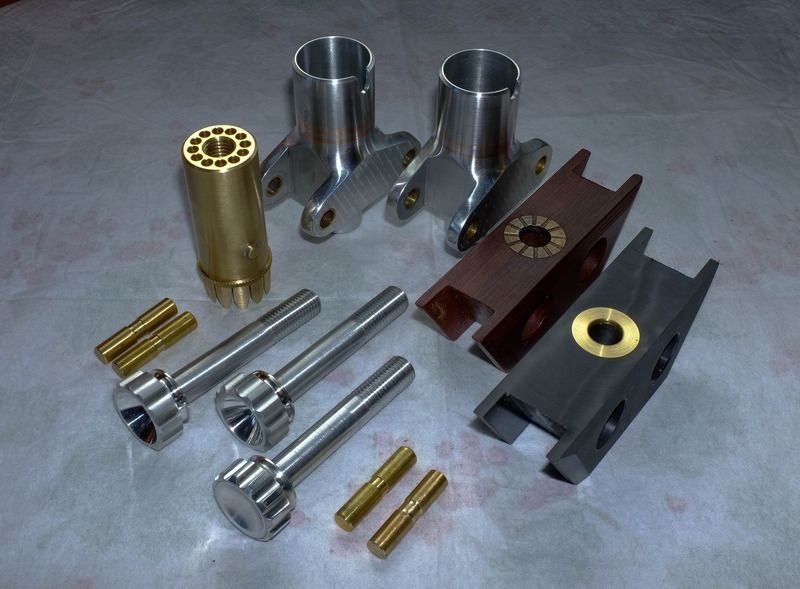
Here are some of the finished parts. Two hinge blocks complete, one of the handle ferrules already splint-ended (the holes on the end are only for lightening), some of the long screws, two sets of hinge pins and two spreader blocks. One is from 'Tufnol' and the other an experimental one from black Nylon, which may-or may not be any good..
Now the arms are being attached to the blocks and opened out to show how the little grub screw holds them captive. When the arm are in the normal position, these are not visible.
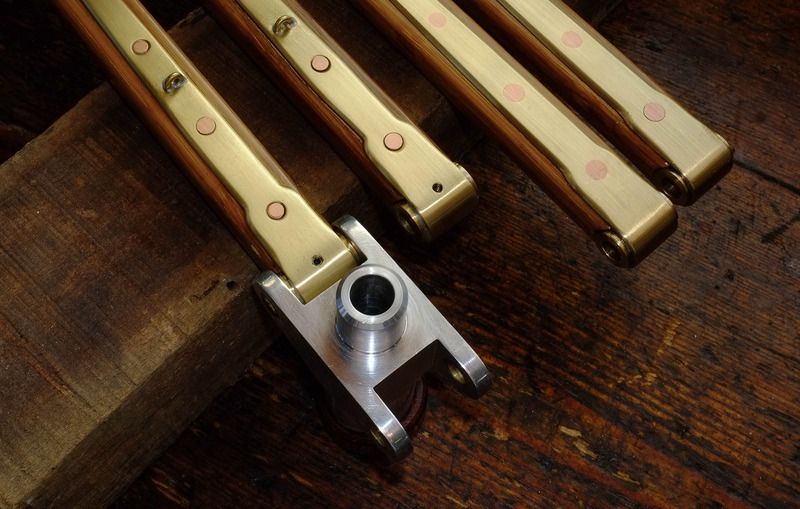
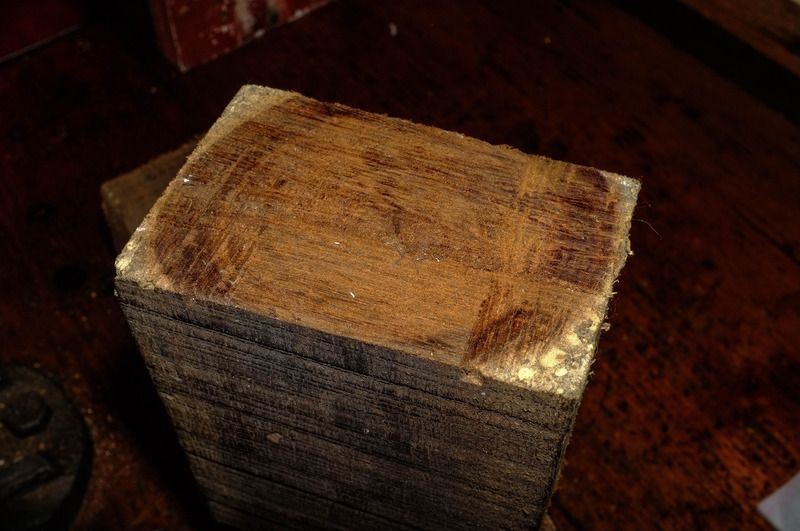
The old piece of wood that the arms are resting on may be of interest. This is a now, thoroughly dried out and preserved piece of actual timber from the wreck of the Metta Catharina. If you 'Google' this, you can read up the history of it. Essentially, it was a Dutch ship which broke moorings and foundered off Plymouth in a storm some 200 years ago (with no loss of life). It was carrying a full cargo of reindeer hides and some years ago, I was involved in the work to dive on the wreck. In return, I was given several complete hides and a piece of the timber. The hides were in perfect condition and after being washed and dressed with oil, are now rolled up and awaiting something to be made from them. I have already used some for fishing baskets, straps etc. and it is wonderful and thick leather. The piece of timber was like jelly on the outside, but when this was cut away, the heartwood has been almost petrified, it is so hard! After some deliberation, I have decided to use part of this to make a special spreader block for one of these nets..
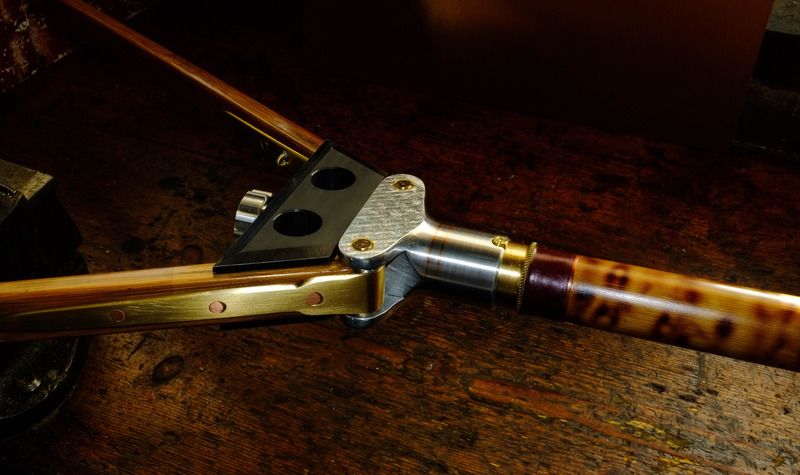
But for now, here are the arms assembled to their finished hinge blocks. The pattern on the block faces is scraped on for decorative purposes..
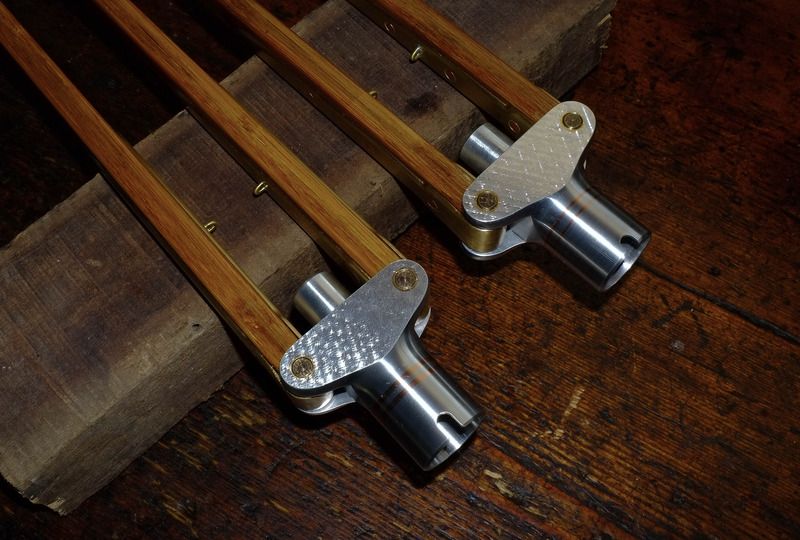
..and this will give you a rough idea of an assembled net although I stress that this is far from finished, the handle tyings yet to be varnished and many other things to be done..
Now this is the wood from the Metta Catharina, after the soft exterior (twice that size) was cut away and all dried out. Just look at that dense grain!
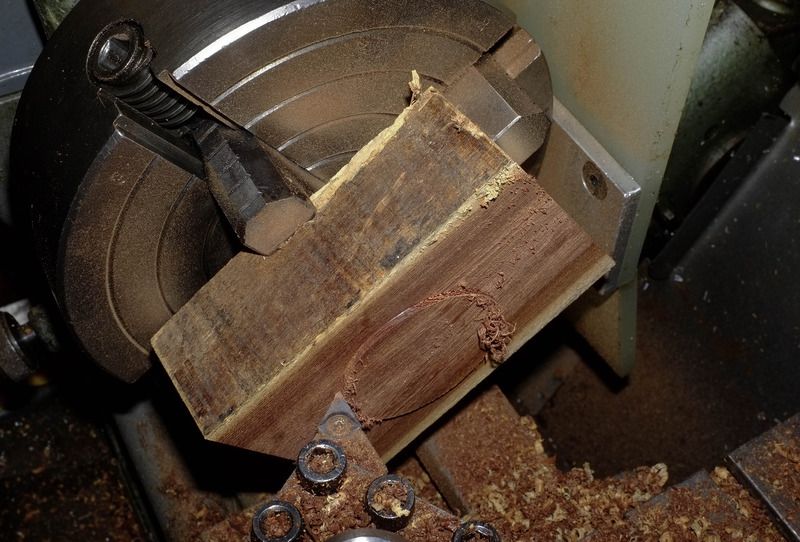
When I was cutting it, the swarf came away as fine dust!
First step was to lose the excess to centre the grain..
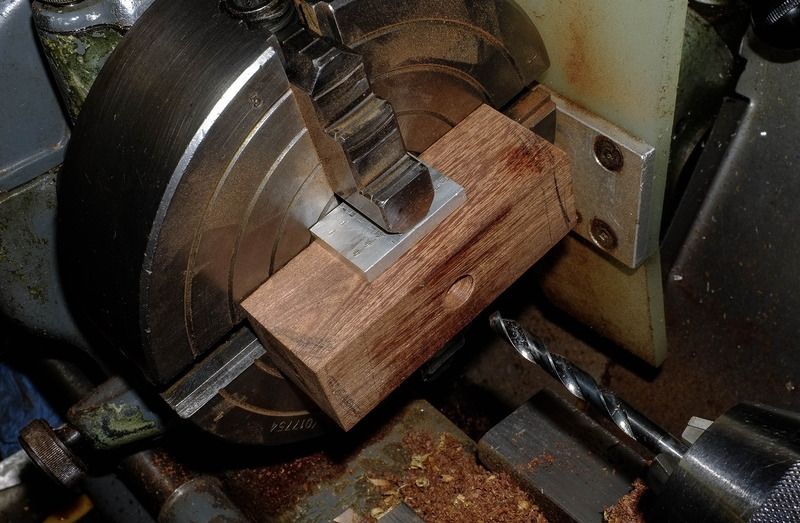
When that was done, the roughed out block was drilled through and bored out to take the spigot fitting..
...and all the other things so that that it ends up like this..
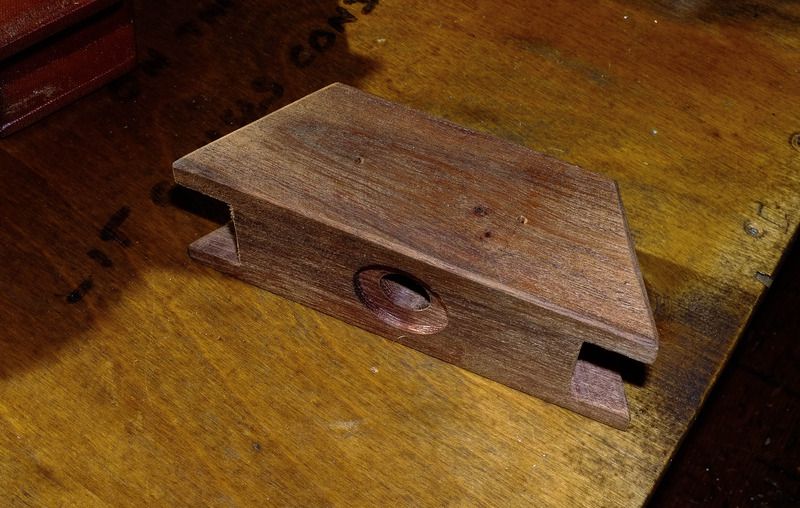
The two holes were then drilled through and some decorative chamfers put in..
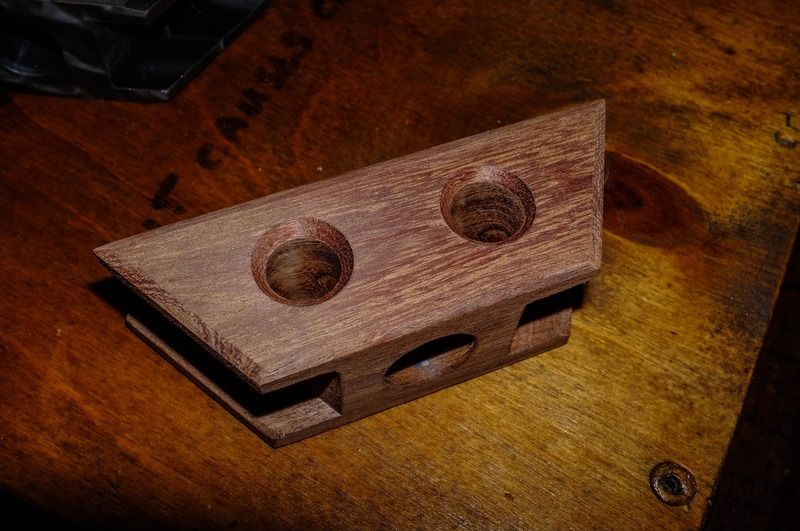
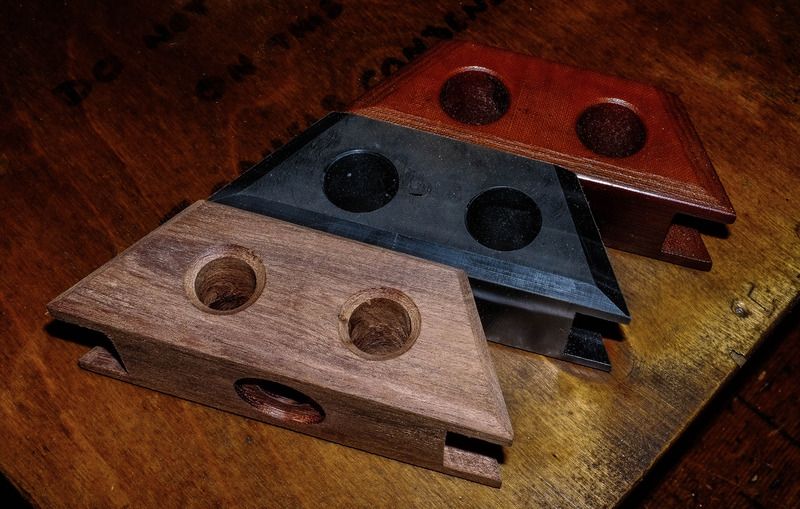
THe reinforcing washer has yet to be fitted, but the wooden block is now ready for preservative treatment. here are the three blocks together..
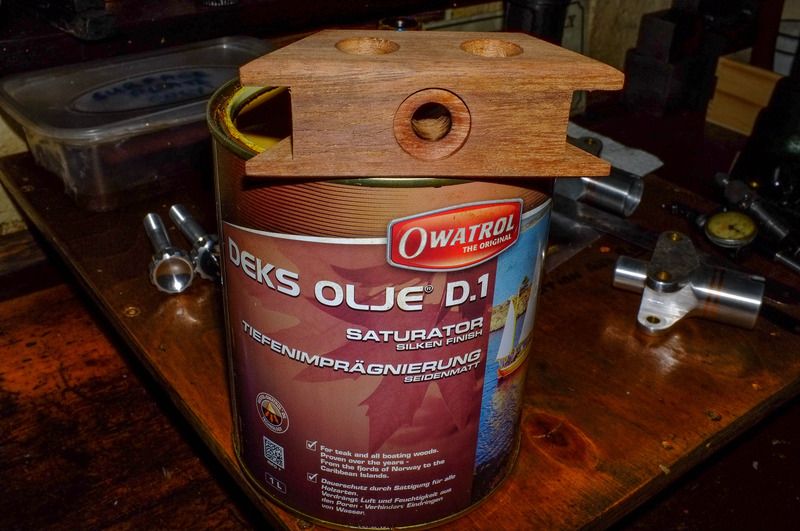
I will leave the wood block immersed in the tin for a week before finishing, to ensure the preservative gets right in..
After that, it's just making up the nets themselves, the net cords and final varnishing, so almost done now..you will be relieved to know!
With regards,
wm+
Because of personal circumstances, this has to be done as-and-when possible, but I promise you, it will be eventually completed!
Anyway, inspired by Northern Nomad, since last time I have acquired a new (to me) attachment for the little Myford, a vertical slide for small milling and drilling tasks. It is not the answer to everything, but will greatly assist in doing many of the jobs that I have hitherto been struggling with..
A said, It will not do everything however, and I still prefer the lathe 4-jaw chick for some of the work, as you will see..
I think that last time, one of the hinge blocks was in rectangular form with the holes for the hinge pins bored through and the little bushes shrink-fitted in place. The next step is to take the block down to correct thickness on both sides, using the lathe like this..
When that was done, the block was repositioned, carefully clocked up true on all faces and, using a centre in the tailstock for support, started roughing away the surplus material at the ferrule end.
The next step is to drill through 25/64" for the attachment screw..
Now I am taking away excess material from where the ferrule will locate, using a 20mm 'Blacksmiths' drill. These are larger drills with a 1/2" shank for use in a conventional drill chuck, but not for accurate work, only roughing out.
This end of the block can now be finished. The outside diameter is done and some decoration added. I am now boring out the ferrule location to size and depth. The little boring bar is also a new addition-a present to myself I am rather proud of, although a bit expensive! It is solid carbide with changeable inserts..very sharp and absolutely rigid!
Here are some of the finished parts. Two hinge blocks complete, one of the handle ferrules already splint-ended (the holes on the end are only for lightening), some of the long screws, two sets of hinge pins and two spreader blocks. One is from 'Tufnol' and the other an experimental one from black Nylon, which may-or may not be any good..
Now the arms are being attached to the blocks and opened out to show how the little grub screw holds them captive. When the arm are in the normal position, these are not visible.
The old piece of wood that the arms are resting on may be of interest. This is a now, thoroughly dried out and preserved piece of actual timber from the wreck of the Metta Catharina. If you 'Google' this, you can read up the history of it. Essentially, it was a Dutch ship which broke moorings and foundered off Plymouth in a storm some 200 years ago (with no loss of life). It was carrying a full cargo of reindeer hides and some years ago, I was involved in the work to dive on the wreck. In return, I was given several complete hides and a piece of the timber. The hides were in perfect condition and after being washed and dressed with oil, are now rolled up and awaiting something to be made from them. I have already used some for fishing baskets, straps etc. and it is wonderful and thick leather. The piece of timber was like jelly on the outside, but when this was cut away, the heartwood has been almost petrified, it is so hard! After some deliberation, I have decided to use part of this to make a special spreader block for one of these nets..
But for now, here are the arms assembled to their finished hinge blocks. The pattern on the block faces is scraped on for decorative purposes..
..and this will give you a rough idea of an assembled net although I stress that this is far from finished, the handle tyings yet to be varnished and many other things to be done..
Now this is the wood from the Metta Catharina, after the soft exterior (twice that size) was cut away and all dried out. Just look at that dense grain!
When I was cutting it, the swarf came away as fine dust!
First step was to lose the excess to centre the grain..
When that was done, the roughed out block was drilled through and bored out to take the spigot fitting..
...and all the other things so that that it ends up like this..
The two holes were then drilled through and some decorative chamfers put in..
THe reinforcing washer has yet to be fitted, but the wooden block is now ready for preservative treatment. here are the three blocks together..
I will leave the wood block immersed in the tin for a week before finishing, to ensure the preservative gets right in..
After that, it's just making up the nets themselves, the net cords and final varnishing, so almost done now..you will be relieved to know!
With regards,
wm+
"Are not two sparrows sold for a farthing? Yet one of them shall not fall without your Father knoweth" ..Jesus of Nazareth, King James AV
-
Paul D
Re: The Richard Walker nets Nos. 2 & 3
Fantastic work Sir.... as normal, haven't heard much from you lately, trust all is well.
Kind regards Paul
Kind regards Paul
-
Mark
- Head Bailiff
- Posts: 21238
- Joined: Mon Aug 22, 2011 4:55 pm
- 12
- Location: Leicestershire
- Contact:
Re: The Richard Walker nets Nos. 2 & 3
Lovely work WM+.
Mark (Administrator)
The most precious places in the English landscape are those secretive corners,
where you find only elder trees, nettles and dreams. (BB - Denys Watkins-Pitchford).
The most precious places in the English landscape are those secretive corners,
where you find only elder trees, nettles and dreams. (BB - Denys Watkins-Pitchford).
-
AshbyCut

- Honorary President
- Posts: 10148
- Joined: Sun May 06, 2012 1:27 am
- 12
- Location: North Warwickshire
Re: The Richard Walker nets Nos. 2 & 3
Oh My Word !
"Beside the water I discovered (or maybe rediscovered) the quiet. The sort of quiet that allows one to be woven into the tapestry of nature instead of merely standing next to it." Estaban.
-
Mushy

- Arctic Char
- Posts: 1633
- Joined: Sat Mar 02, 2013 8:56 pm
- 11
- Location: Surrey