The Richard Walker nets Nos. 2 & 3
-
MGs

- Pike
- Posts: 6430
- Joined: Wed Nov 02, 2011 2:24 pm
- 12
- Location: Cornwall
Re: The Richard Walker nets Nos. 2 & 3
Fine attention to detail as ever
Old car owners never die....they just rust away
-
Hovis

- Tench
- Posts: 2528
- Joined: Tue Apr 02, 2013 1:54 pm
- 11
- Location: Nottingham
Re: The Richard Walker nets Nos. 2 & 3
Wonderful as always. Glad it’s not only me who makes things that don’t always work out first time!
I have laid aside business, and gone a'fishing.
Izaak Walton
Izaak Walton
-
Beresford

- Sea Trout
- Posts: 4261
- Joined: Sat Dec 17, 2011 1:26 pm
- 12
Re: The Richard Walker nets Nos. 2 & 3
Ah yes… it died a death due to cost and lack of interest really. The digital drawings were nearly complete, one last undercut to draw at the engineers request and it was all ready to import into CAD/CAM for 'mass' production.Paul Cook wrote: I seem to recall a forum member unsuccessfully trying to collate a few interested parties to pool together enough people to fund the parts for a walker net but cost killed it in the end .
The Split Cane Splinter Group
-
The Sweetcorn Kid

- Wild Carp
- Posts: 11792
- Joined: Fri Aug 26, 2011 7:09 pm
- 12
- Location: Portsmouth
- Contact:
Re: The Richard Walker nets Nos. 2 & 3
Unsurpassed skill..... 
SK
The Compleat Tangler
“Imagination is the real magic that exists in this world. Look inwards to see outwards. And capture it in writing.”
Nigel 'Fennel' Hudson
Click here for my Youtube Channel...
https://www.youtube.com/channel/UCeoyLH ... 5H4u8sTDgA
The Compleat Tangler
“Imagination is the real magic that exists in this world. Look inwards to see outwards. And capture it in writing.”
Nigel 'Fennel' Hudson
Click here for my Youtube Channel...
https://www.youtube.com/channel/UCeoyLH ... 5H4u8sTDgA
-
Watermole+

- Chub
- Posts: 1058
- Joined: Thu Mar 15, 2012 11:07 pm
- 12
- Location: Devon & Cornwall border
Re: The Richard Walker nets Nos. 2 & 3
Richard C wrote: It feels like a void left by Jack Hargreaves in his workshop is filled with awe and wonderment once again.
Thank you Richard, but it will be a long time indeed before I, or anyone else could step in to Jack's shoes..!
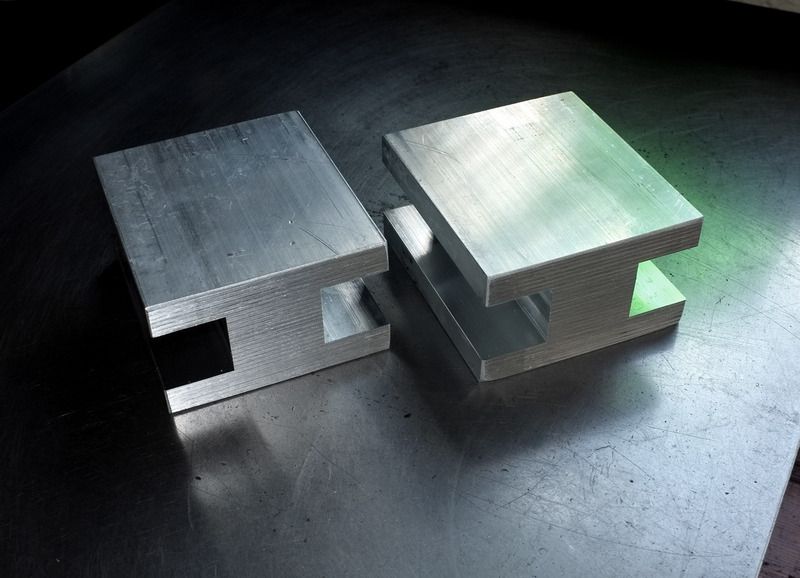
Last time, I was starting to cut out the slots in the hinge blocks. Between then and now, all I have done is to semi-finish one of these so not much to report. However, I have had a request to show this as a step-by-step for the lathe-but not mill owner, so it will be mostly pictures today. To make one of these using a vertical mill is a comparatively straightforward job, but doing it this way is rather long-winded and time consuming so bear with me please.
Carrying on from last time then, the process was repeated for the second block and they are now at this stage..
I would like to add that there is nothing wrong-from the amateur point of view-of doing all operations on a lathe, it is just that it takes so much longer; but because economics don't really come into it, it doesn't really matter how the job is done, so long as the necessary levels of accuracy and finish are achieved.
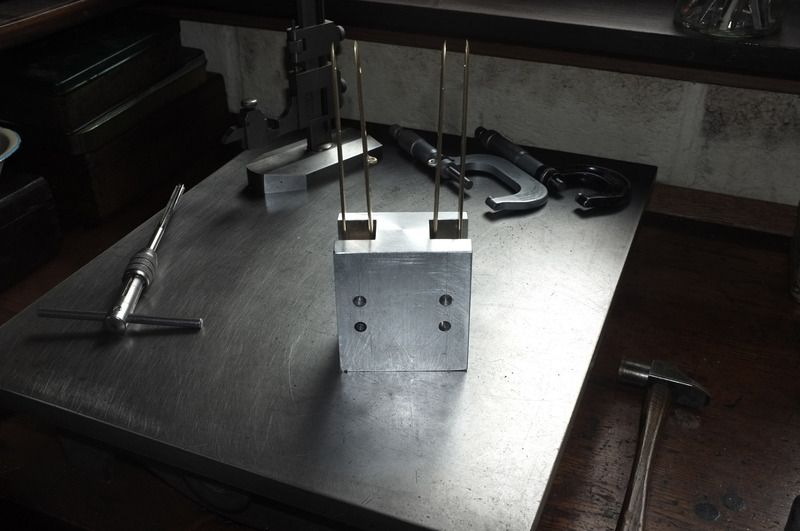
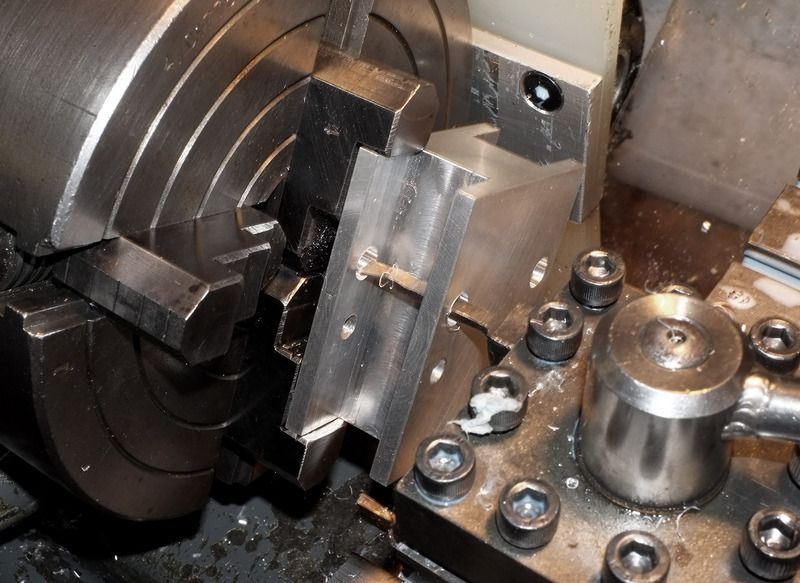
The next step was to mark out and put in the holes for the hinge pins-and this is where it nearly came to grief..
Three out of the four holes went in correctly but the fourth-for some reason-was 0.010" out of position. It doesn't sound much but it meant that one of the pins would not line up. A quick calculation showed that all was not lost and that in this case, I had two bites of the cherry, so-to-speak. Because much of the metal around the holes is wasted away, I could simply reverse the block and try again! The holes will be finally finished at 0.250" (1/4") but for now they are just plain drilled at 6mm, which is 0.2362", well undersize. Here I am checking for alignment by inserting some plain, 6mm dowels through the holes..
Next, I put up the 4-jaw chuck and turned the blocks back to 1 1/8" thickness, one side at a time. The coloured pads are to prevent the chuck jaws marking the job.
Again, in a similar manner, the blocks were brought back to correct width, plus 0.010" for finish filing. All dimensions are relative to the position of the 3/4" wide slots.
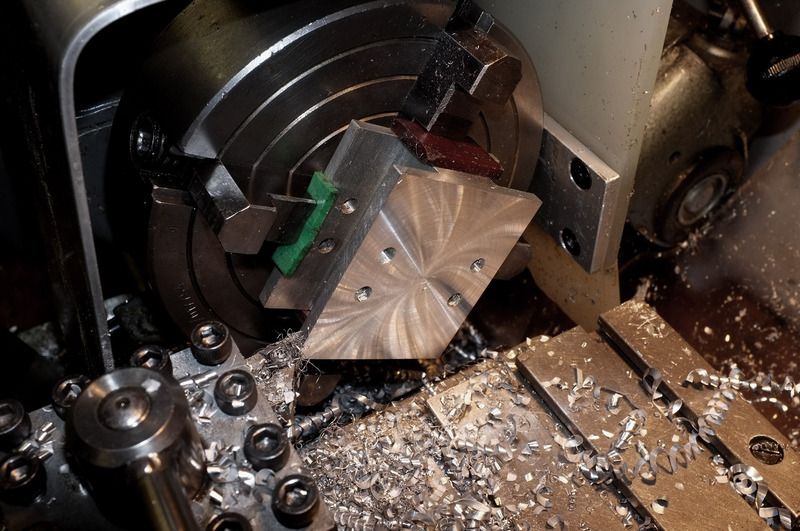
Next, some tricky and careful positioning of the blocks in the 4-jaw was called for, using a clock to set up and then bore out the holes in-line and true to 0.3125". ..How simple (but not necessarily more accurate) this would be on a mill!
Now some bushes were made to 0.315" diameter, so they would be a press fit in the holes. The best way to do this is to firstly get everything ready (speed is of the essence), then put the bushes in the freezer and warm up the block. Then, using a stepped size drift, tap in the bushes..you have mere seconds to do this before the temperatures equalize and the bushes are locked in!
Here, I have already fitted one and the other three are ready for the freezer.
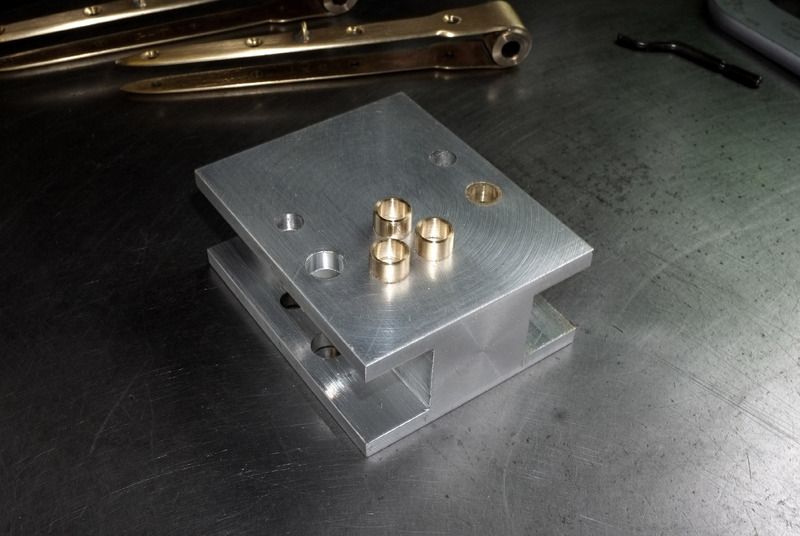
The bushes were turned-and bored-in line but will have now closed down so the next thing is to ream them back out to size and in alignment with each other.
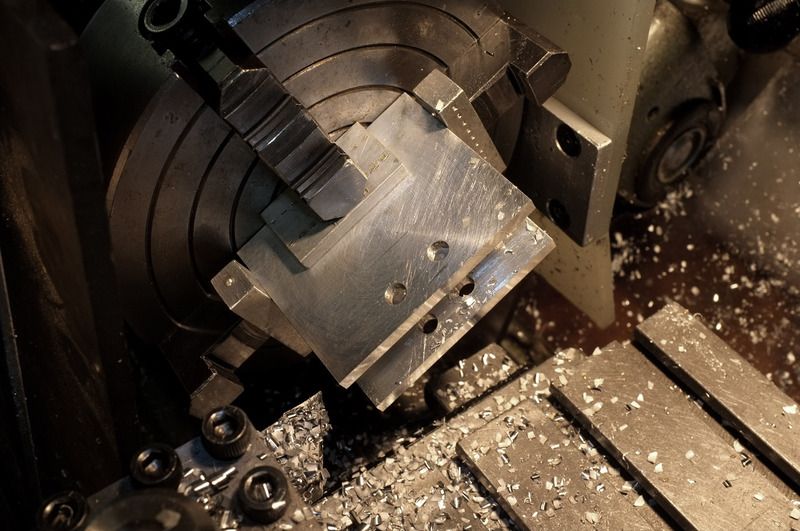
Now the block must be exactly positioned in the lathe chuck and the outside turned to 1" diameter on the ferrule end. It is helpful to mark out in pencil as a guide, where the cut line stops. Note also the use of the tailstock as a steady..
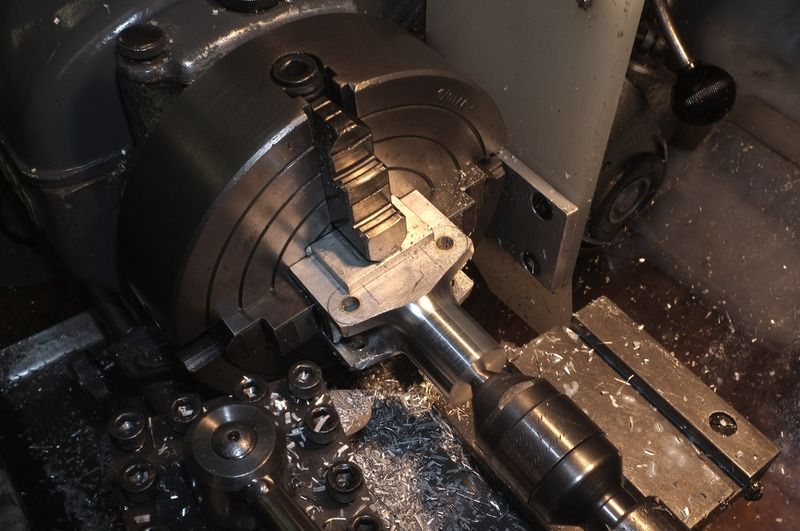
When you have the desired profile on that end, drill through to 3/8" BSF clearance size and counter bore out to fit the handle ferrule, in this case a 0.875" (7/8") diameter x 1 5/8" deep, flat-bottomed hole.
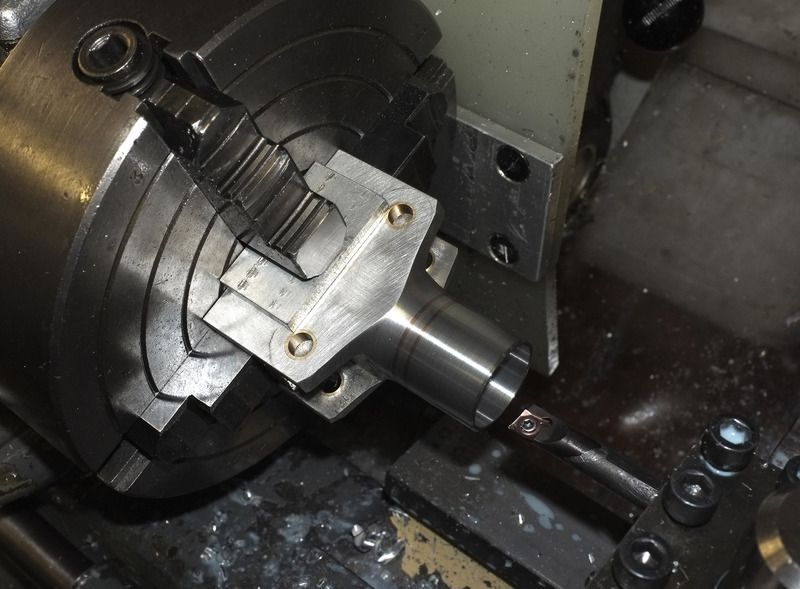
The job was then reversed in the chuck and a 0.625" (5/8") diameter x 5/8" long spigot turned..
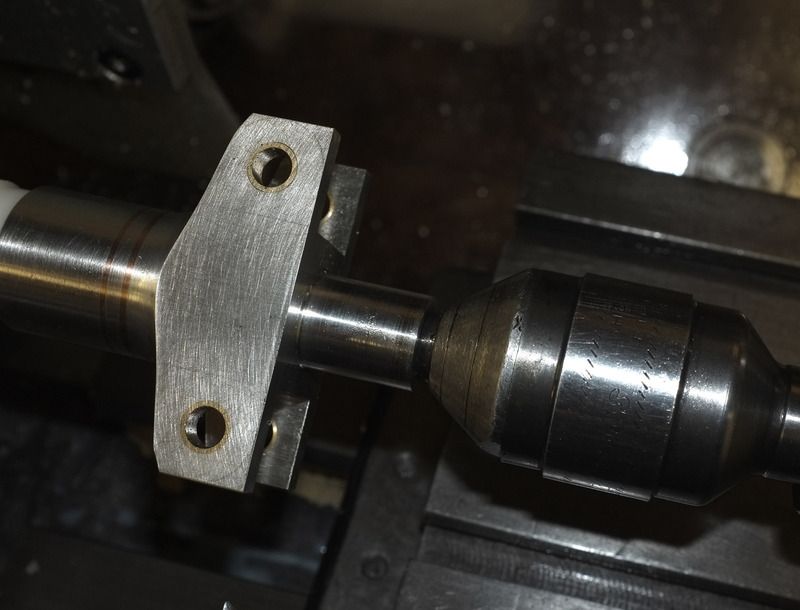
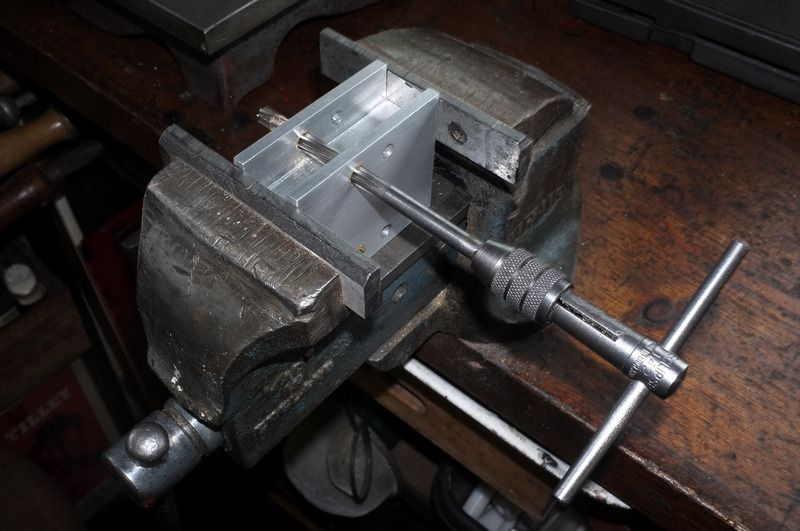
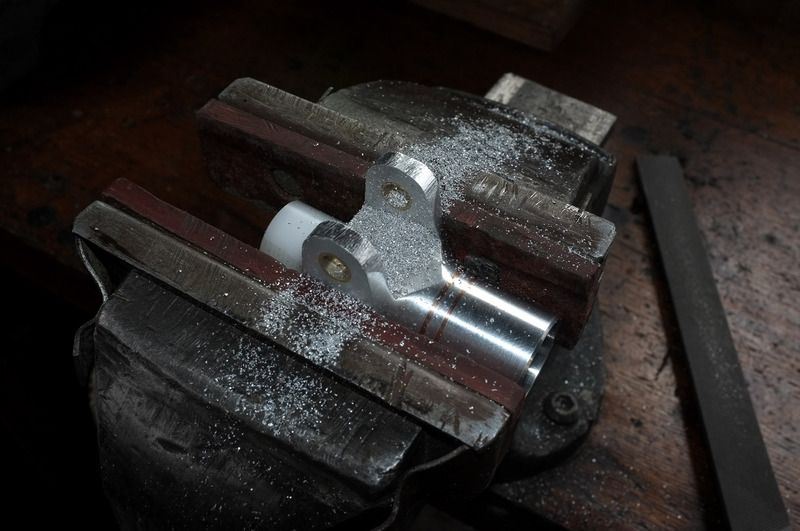
Now it's back to the vice and time to get the files out! The hole edges are now radiused off and blended in, all being then rubbed down with a 'Scotchbrite' pad. The white piece on the spigot is merely a protector against accidental slips with the file, made from some scrap delrin. I also made a similar one for the other end but for some reason, have not fitted it!
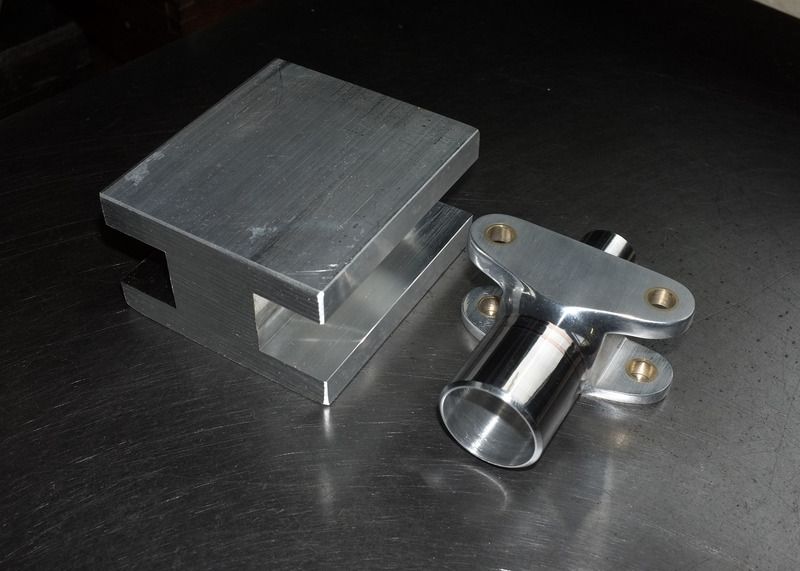
The anti-rotation screw slot will be put in later, but apart from that, this part is almost complete. Here you see it 'before-and after'. The second block was then given the same process..
The holes in the arm straps were then hand-reamed out to 0.250" and trial-fitted together using plain, 1/4" dowels which have been polished down to 0.2495"
There are still the long bolts and spreader blocks to make of course-but that will have to be for later...
Regards to all,
wm+
"Are not two sparrows sold for a farthing? Yet one of them shall not fall without your Father knoweth" ..Jesus of Nazareth, King James AV
-
Barbulus

- Tench
- Posts: 2510
- Joined: Sun Aug 25, 2013 1:51 pm
- 10
Re: The Richard Walker nets Nos. 2 & 3
Wow yet again ! A fascinating post and photographs. Looking forward to see the next instalment now.
-
Buller
- Rudd
- Posts: 346
- Joined: Wed Jul 04, 2012 8:33 am
- 11
Re: The Richard Walker nets Nos. 2 & 3
As we say at the tip of the Dark Continent... Aeisch!! It's an expression of awe pronounced ayy-sh. Simply jaw-dropping!
-
Watermole+
- Chub
- Posts: 1058
- Joined: Thu Mar 15, 2012 11:07 pm
- 12
- Location: Devon & Cornwall border
Re: The Richard Walker nets Nos. 2 & 3
Well, it has certainly been a while since anything has been done on this project! I cannot believe that I have neglected it for so long, but with any luck, this should be back under way fairly soon now.
Over the past few months, my computer finally gave up the ghost and took all the old files with it. Recurring joint problems meant that work was being severely curtailed, so a lot of projects had to be put on hold. The past few weeks have seen a lot of catch-up work done and learning all about the new computer and how to edit pictures.
However, the brain hasn't been entirely idle and have come up with some improvements to the Richard Walker nets 2 and 3.
I hope you will forgive very short post today as this will be the first try at getting edited pictures through Photobucket and on to the forum. I have to edit as my photography is rather lacking!
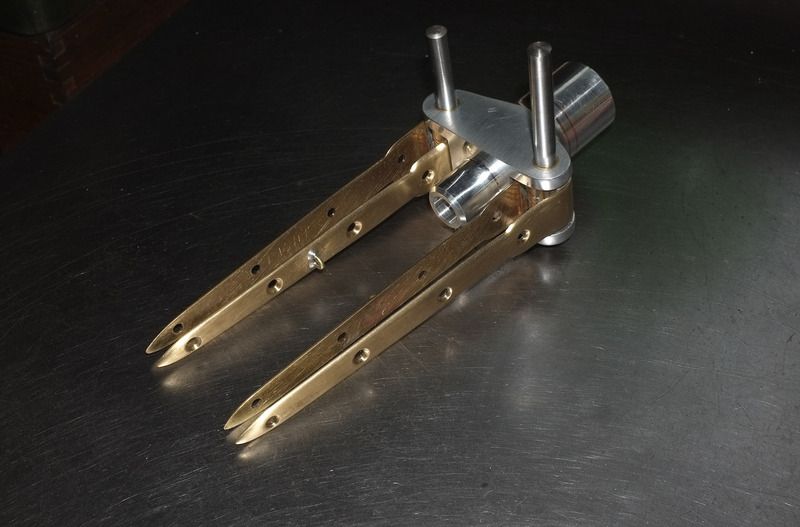
...When last we spoke, many moons ago, the brass straps were all ready to be fitted to the finished arms. I have been thinking about neater ways to fitting the hinge pins and one of our master net-makers, Northern Nomad, has shown the way..
Taking his refinements a bit further then, I have now totally dispensed with both the slotted screw head and the thread in the hinge block. Instead, the pins-which are a good, push fit in to the bushed hinge block- have a little waist section relief, turned into the middle part. On the inside part of the brass straps, I have drilled & tapped an M3 thread into which is fitted a tiny grub screw. This screw bears no strain, it simply holds the pin securely in place and would only become visible, if the netting itself were to be removed and the arms opened out.
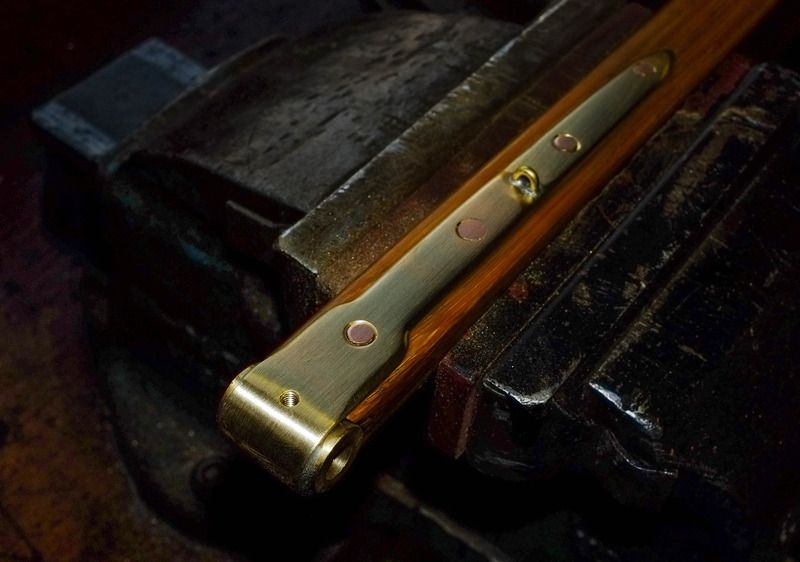
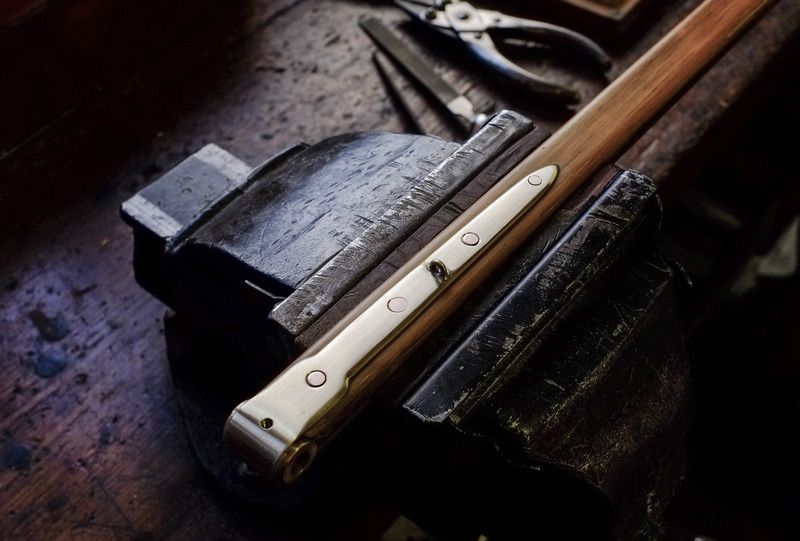
Here are a couple of photos to show you. The straps have now been riveted to the arms, likewise the little loops at the arm ends which take the net cord, although the latter will be bound on and varnished for security.
Over the past few months, my computer finally gave up the ghost and took all the old files with it. Recurring joint problems meant that work was being severely curtailed, so a lot of projects had to be put on hold. The past few weeks have seen a lot of catch-up work done and learning all about the new computer and how to edit pictures.
However, the brain hasn't been entirely idle and have come up with some improvements to the Richard Walker nets 2 and 3.
I hope you will forgive very short post today as this will be the first try at getting edited pictures through Photobucket and on to the forum. I have to edit as my photography is rather lacking!
...When last we spoke, many moons ago, the brass straps were all ready to be fitted to the finished arms. I have been thinking about neater ways to fitting the hinge pins and one of our master net-makers, Northern Nomad, has shown the way..
Taking his refinements a bit further then, I have now totally dispensed with both the slotted screw head and the thread in the hinge block. Instead, the pins-which are a good, push fit in to the bushed hinge block- have a little waist section relief, turned into the middle part. On the inside part of the brass straps, I have drilled & tapped an M3 thread into which is fitted a tiny grub screw. This screw bears no strain, it simply holds the pin securely in place and would only become visible, if the netting itself were to be removed and the arms opened out.
Here are a couple of photos to show you. The straps have now been riveted to the arms, likewise the little loops at the arm ends which take the net cord, although the latter will be bound on and varnished for security.
"Are not two sparrows sold for a farthing? Yet one of them shall not fall without your Father knoweth" ..Jesus of Nazareth, King James AV
-
Kingfisher

- Catfish
- Posts: 5772
- Joined: Sat Apr 07, 2012 4:14 am
- 12
- Location: Llandrindod Wells (Mid Wales)
Re: The Richard Walker nets Nos. 2 & 3
I can't wait for the next instalment WM Sir, it looks brilliant.
Sorry to hear that you've been unwell WM, I hope you're feeling better now.
Sorry to hear that you've been unwell WM, I hope you're feeling better now.
God never did make a more calm, quiet, innocent recreation than angling.
Izaak Walton
-
MGs
- Pike
- Posts: 6430
- Joined: Wed Nov 02, 2011 2:24 pm
- 12
- Location: Cornwall
Re: The Richard Walker nets Nos. 2 & 3
Very nice as ever
Old car owners never die....they just rust away