Making a Traditional Net..of sorts.
-
Hermit

- Rudd
- Posts: 354
- Joined: Sun Apr 22, 2012 11:44 pm
- 12
- Location: Derbyshire
Re: Making a Traditional Net..of sorts.
Fantastic WM+, genius at work! 
Fishing is worth no more than its pleasure. Bernard Venables.
-
The Sweetcorn Kid

- Wild Carp
- Posts: 11792
- Joined: Fri Aug 26, 2011 7:09 pm
- 12
- Location: Portsmouth
- Contact:
Re: Making a Traditional Net..of sorts.
Breathtaking skill!!!
Have you made my reel yet??
Have you made my reel yet??
SK
The Compleat Tangler
“Imagination is the real magic that exists in this world. Look inwards to see outwards. And capture it in writing.”
Nigel 'Fennel' Hudson
Click here for my Youtube Channel...
https://www.youtube.com/channel/UCeoyLH ... 5H4u8sTDgA
The Compleat Tangler
“Imagination is the real magic that exists in this world. Look inwards to see outwards. And capture it in writing.”
Nigel 'Fennel' Hudson
Click here for my Youtube Channel...
https://www.youtube.com/channel/UCeoyLH ... 5H4u8sTDgA
-
Scott

- Tench
- Posts: 2699
- Joined: Thu Mar 22, 2012 10:22 am
- 12
- Location: The Lake District
Re: Making a Traditional Net..of sorts.
Awesome craftsmanship! Can't wait to see the next instalment!
-
Wallys-Cast

- Pike
- Posts: 6654
- Joined: Tue Mar 20, 2012 11:02 am
- 12
- Location: Durham.
Re: Making a Traditional Net..of sorts.
Superb workmanship and innovation WM+. Not to mention patience by the bucketfull. 
Wal.
Wal.
-
Swythyn Troutbeck

- Grayling
- Posts: 652
- Joined: Thu Feb 28, 2013 12:44 pm
- 11
- Location: Britanny/Normandy border
- Contact:
Re: Making a Traditional Net..of sorts.
I am mesmerised WM. This is really fascinating and fantastic stuff!
Troutbeck
Troutbeck
When I'm not fishin' I'm fettlin'
-
Hovis

- Tench
- Posts: 2528
- Joined: Tue Apr 02, 2013 1:54 pm
- 11
- Location: Nottingham
Re: Making a Traditional Net..of sorts.
What can you say? Stunning just doesn't do it justice. Mend and make do just how I like it.
I have laid aside business, and gone a'fishing.
Izaak Walton
Izaak Walton
-
Richard C

- Brown Trout
- Posts: 1417
- Joined: Sun Mar 25, 2012 11:59 am
- 12
- Location: East Sussex
Re: Making a Traditional Net..of sorts.
In WM's own modest and mildly understated style...'that's coming along quite nicely !' 
"We shall not cease from exploration. And the end of all our exploring will be to arrive where we started and know the place for the first time.".
T. S Eliot
http://richard-cleaver.blogspot.co.uk/
T. S Eliot
http://richard-cleaver.blogspot.co.uk/
-
Watermole+

- Chub
- Posts: 1058
- Joined: Thu Mar 15, 2012 11:07 pm
- 12
- Location: Devon & Cornwall border
Re: Making a Traditional Net..of sorts.
Part 4.
This is the bit a lot of you want to see and at long last, the yoke which holds everything together has now been made-up to a point.
However, the 'arms' have not been finished and the holes haven't been drilled yet for the screws, net ties etc. but at least we are now getting somewhere! This project seems to be going on forever..the problem is just getting the time to devote to it now.
Two TFFers out there (one in Germany who has a Myford!) are following this and have asked if I could show the making of this part as a detailed step-by-step so there are going to be a more pictures than words today with just a brief explanation in between..
Most of this part involves the use of a 4-jaw independent chuck in the lathe. This is an extremely useful addition to any would-be engineer's armoury because as it's name implies, with this chuck, each jaw can be moved independently of the others, inside or out, to hold and produce a variety of shapes in an almost limitless number of ways. Square, oblong, octagonal-whatever, can be made, as you will see..
So then; Making the Yoke.
I started by 'tweaking' two arms to approximately the same radius as the wood and soldering them together in a little jig. The joining part will be made from a block of brass left over from the lathe making project.
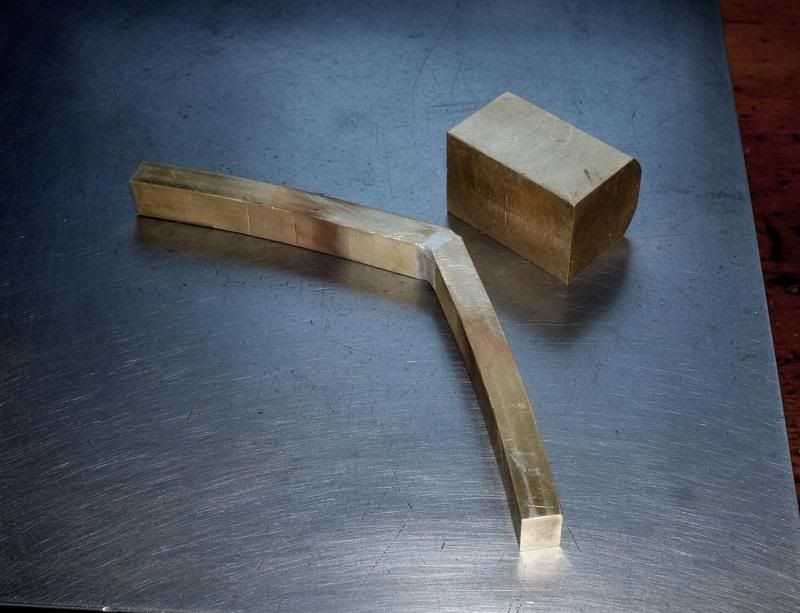
The block was then marked out and set up in a vice, which itself was then firmly clamped to the lathe saddle. The cutter was a milling tool held in the lathe chuck.
The first step was to cut out an angled groove to halfway (plus half the cutter diameter) across the block..

..to produce this.
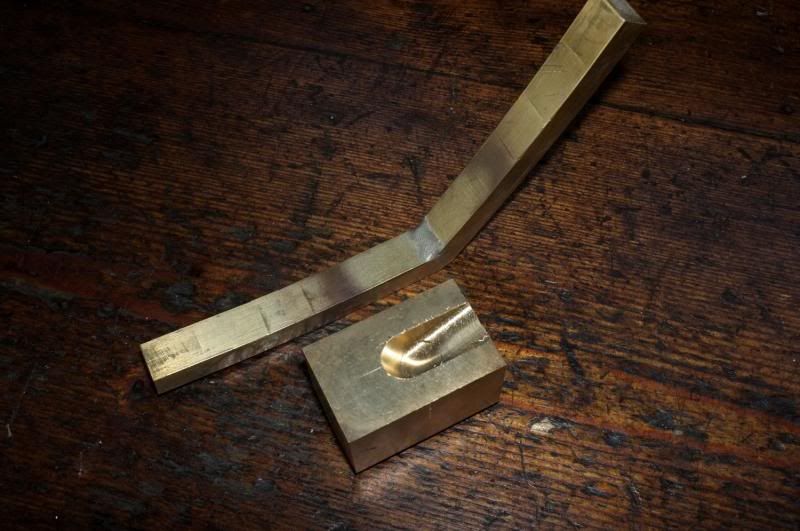
The vice was then re-positioned and a similar op. done on the other side..
..which made this.
It is important that the 'arms' are a good, snug fit within this groove so milling must be with only light cuts.
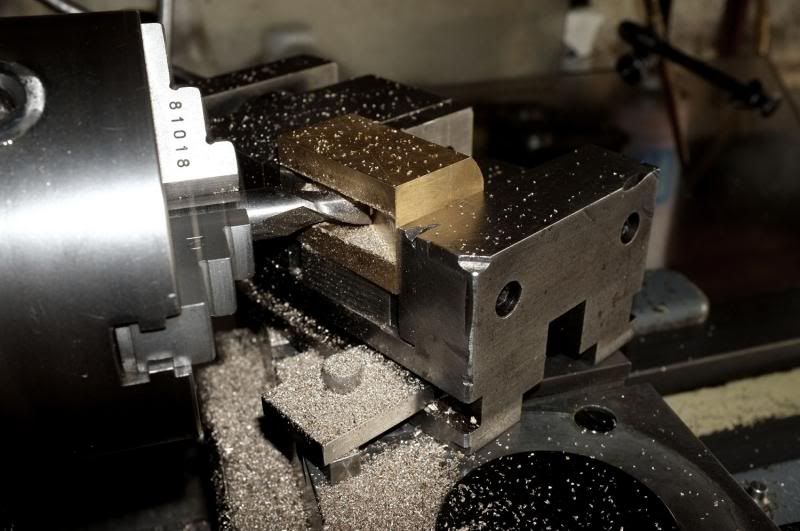
The next stage is to remove some of the excess metal from each side of the block to bring it down to the desired thickness. In this case, I want the side plates to be 1/16". This is where the 4-jaw independent comes into it's own.
The block was set up in the jaws, parallel with the back face of the chuck and the sides machined off with a conventional cutting tool.
I have gripped the workpiece directly in the jaws because there is much metal to come off. If this was a finished size, I would interface some 'pads' between jaws and work to prevent it being marked.
Anyway, after both sides had been machined, time for a trial fit..
AS you see, it goes together..a nice, 'tap' fit.
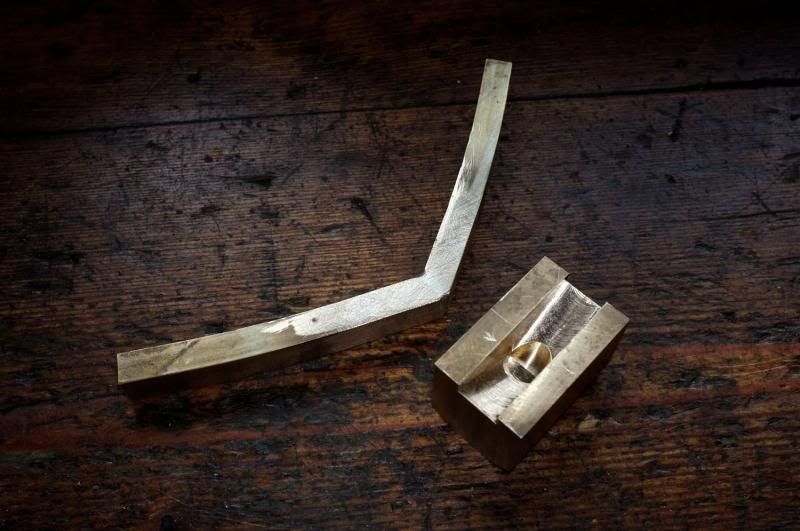
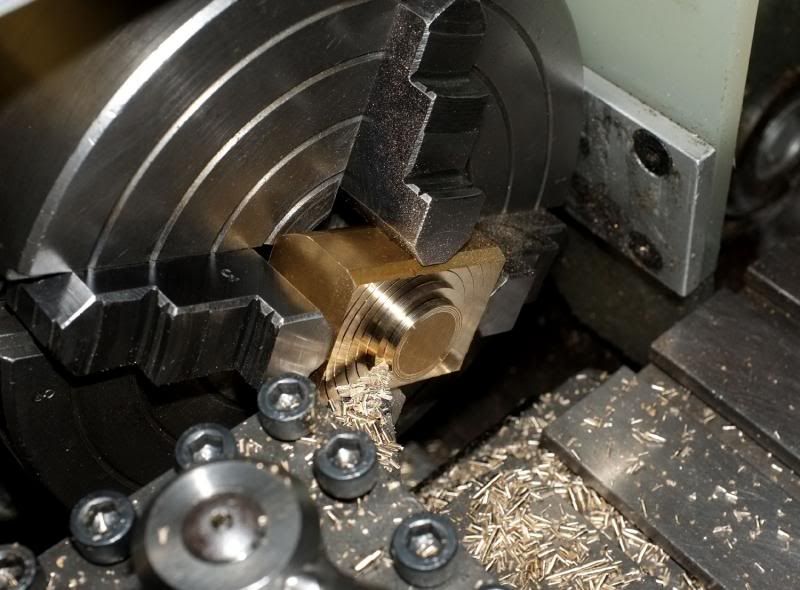
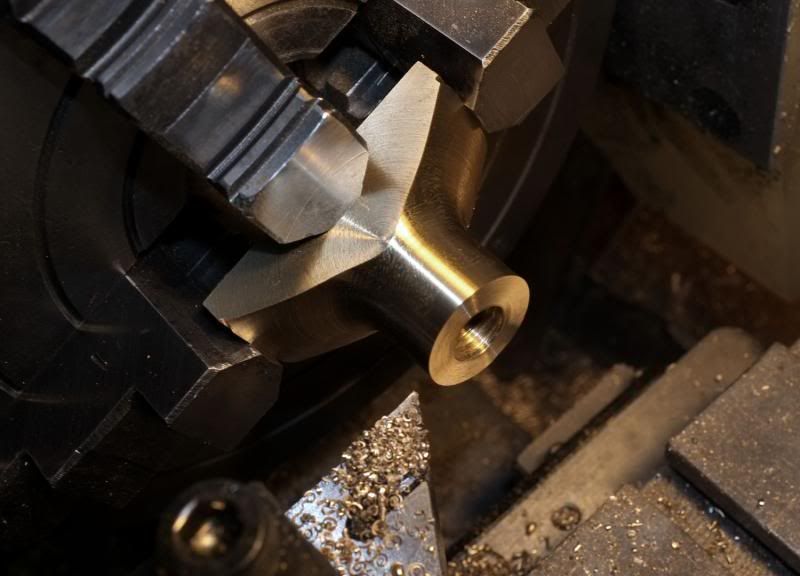
Now we have to remove the excess from the profile to produce the shape required. Because I am only gripping the job by a small amount, it was prudent to support it with a centre in the tailstock. It was then re-positioned in the chuck, 'clocked' true and roughed out firstly with the same cutting tool..
..and then finished with a piece of HSS (High Speed Steel) ground free-hand to an 8mm radius..
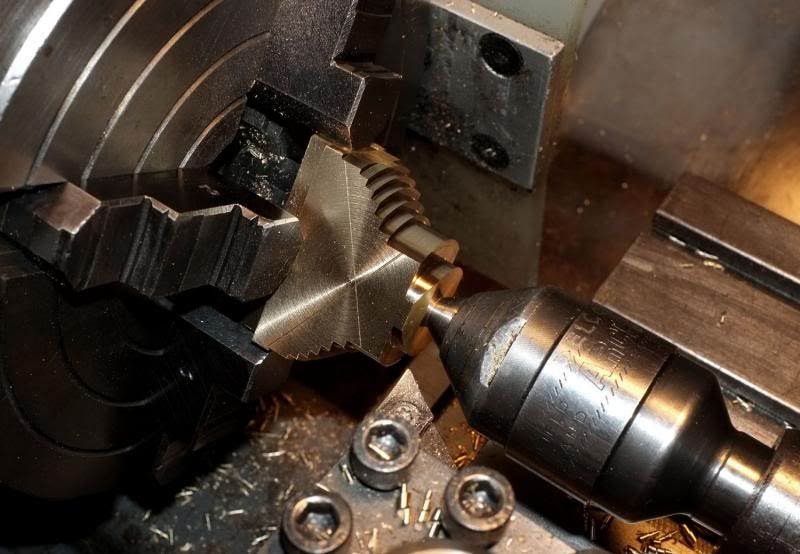
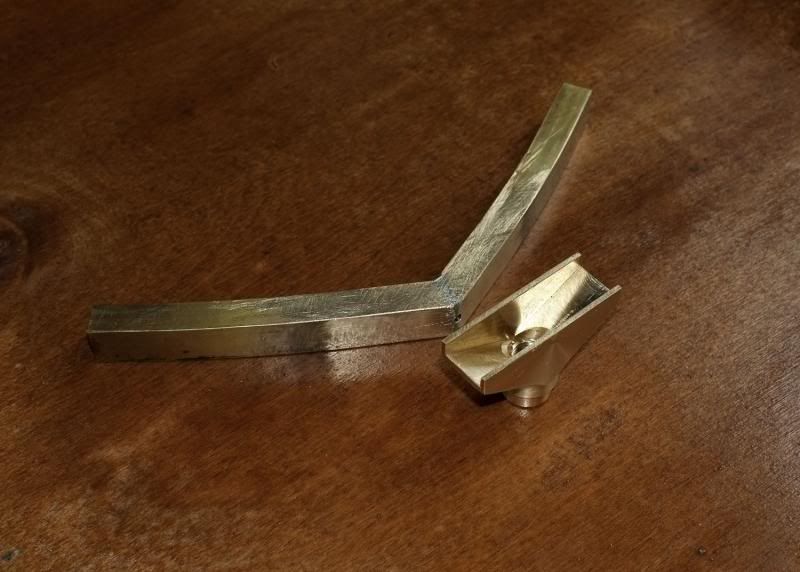
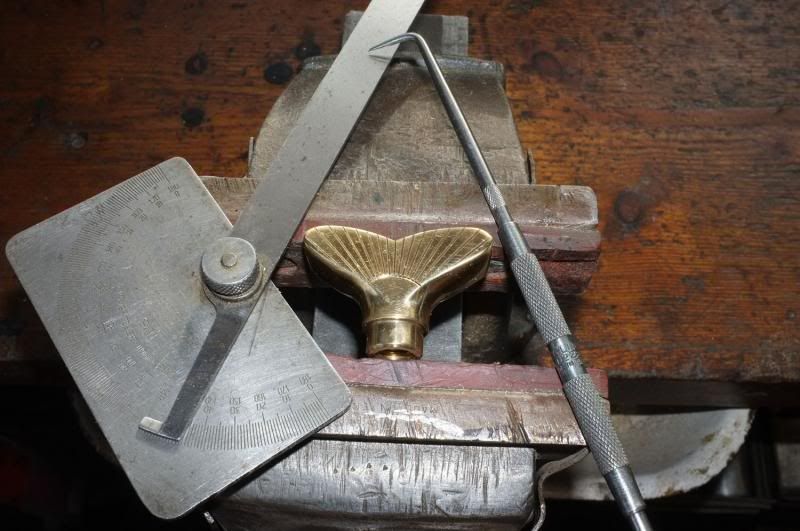
Next, I faced off the front, then drilled and tapped a conventional 3/8" BSF thread; also (not shown) cut a 'location' diameter in front. The reason for this is because I don't like the idea of just an unsupported thread joining net to handle and have machined a little step for the handle to locate in first.
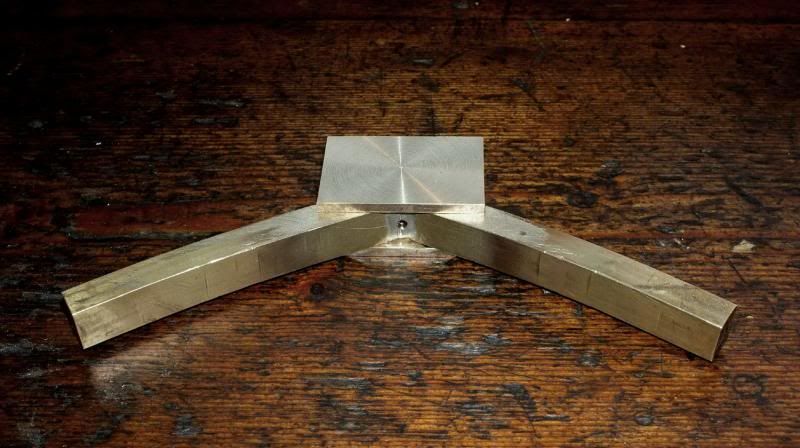
Here are the two parts so far. They will soon be ready for soldering. The little hole in the centre of the arms is in fact an M3 thread I put in for temporary location.
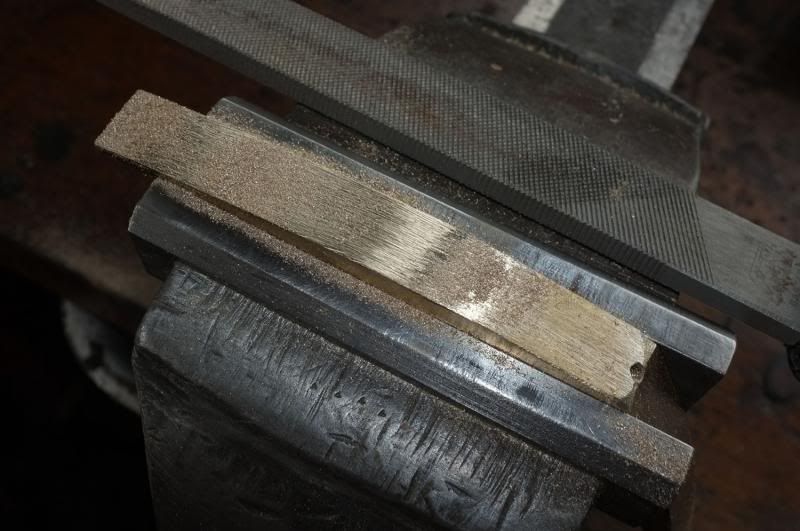
Now it was time to dress up the inside of the arms with a file to be the same radius as the wood frame.
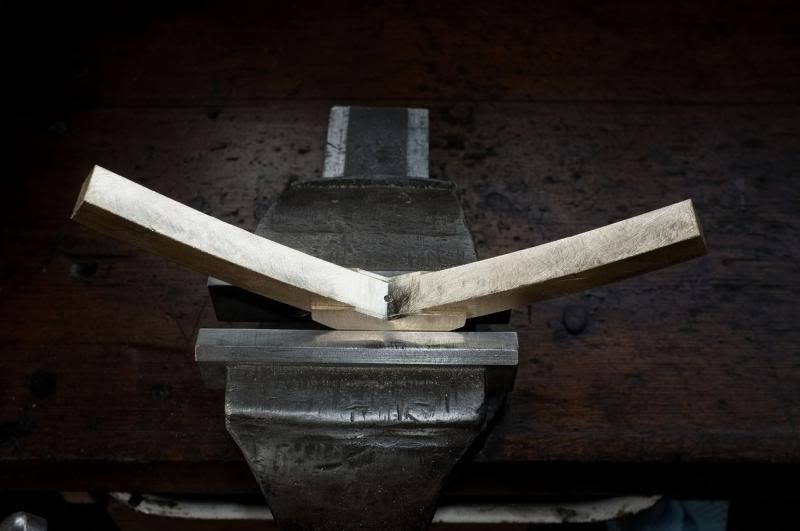
Also, by temporarily attaching both parts with an M3 screw from the bottom, I was able to file away the centre to match the arms.
The centre was now separated and some extensive filing and 1st. stage polishing done on it..
Now it was time to do a lot of heavy filing to remove most of that excess metal from the arms.
First 'blend in'...
..Then file the 'step'..

That was warm work!
Next, the two parts have to be soldered together, but before that, a little largesse with the scriber...!
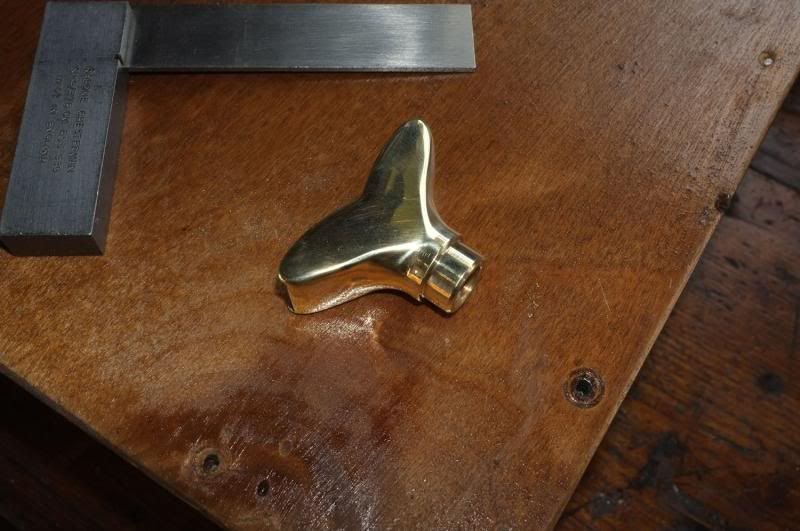
Now they are soldered together.
A word about this. The solder used for joining the arms is a HARD solder and has a much higher eutectic point than that which I used for this stage, otherwise they would fall apart! For this reason, be careful with the heat source when you do this. I thoroughly cleaned and degreased both parts in thinners first, then 'pickled' and 'tinned' them with Bakers No.3 soldering fluid. The parts were tapped together and just enough heat used to melt them together-and no more! I washed the assembly in warm water afterwards to neutralize and prevent further corrosion of the Baker's fluid.
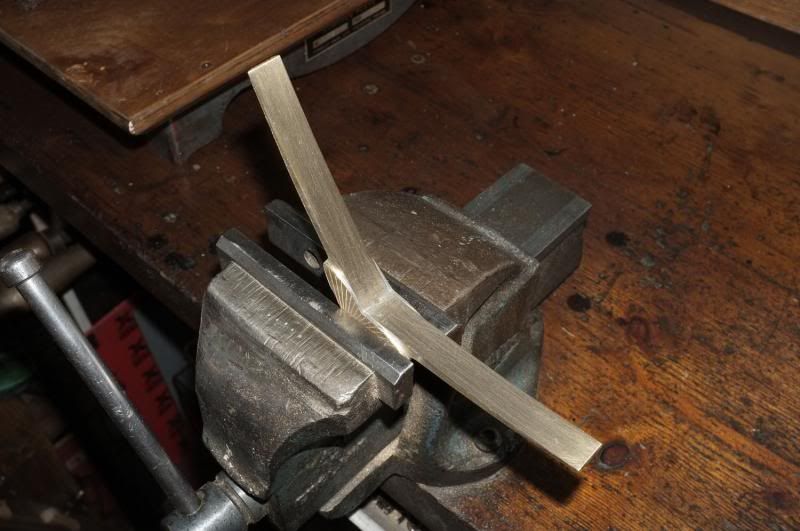
As you can see, this produces a very clean and strong joint which will remain bright.
Now you can see how it will go together with the net frame..
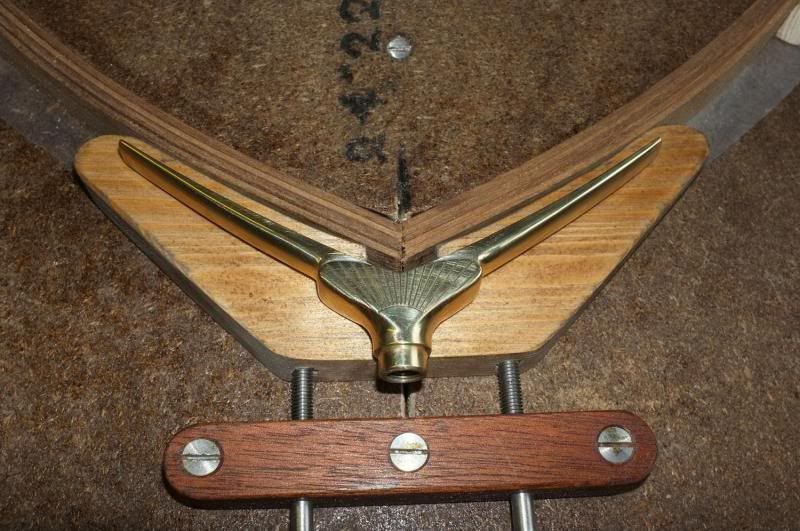
I'm going to leave the frame in the former for a while longer yet.
The next stage will be to glue up the strips and sand them down after. One-or two parts to be made yet though and then the handle. I already have a nice,3/4" soft-mesh, green net to go on this..
..but more next time..
Regards to all
wm+
This is the bit a lot of you want to see and at long last, the yoke which holds everything together has now been made-up to a point.
However, the 'arms' have not been finished and the holes haven't been drilled yet for the screws, net ties etc. but at least we are now getting somewhere! This project seems to be going on forever..the problem is just getting the time to devote to it now.
Two TFFers out there (one in Germany who has a Myford!) are following this and have asked if I could show the making of this part as a detailed step-by-step so there are going to be a more pictures than words today with just a brief explanation in between..
Most of this part involves the use of a 4-jaw independent chuck in the lathe. This is an extremely useful addition to any would-be engineer's armoury because as it's name implies, with this chuck, each jaw can be moved independently of the others, inside or out, to hold and produce a variety of shapes in an almost limitless number of ways. Square, oblong, octagonal-whatever, can be made, as you will see..
So then; Making the Yoke.
I started by 'tweaking' two arms to approximately the same radius as the wood and soldering them together in a little jig. The joining part will be made from a block of brass left over from the lathe making project.
The block was then marked out and set up in a vice, which itself was then firmly clamped to the lathe saddle. The cutter was a milling tool held in the lathe chuck.
The first step was to cut out an angled groove to halfway (plus half the cutter diameter) across the block..
..to produce this.
The vice was then re-positioned and a similar op. done on the other side..
..which made this.
It is important that the 'arms' are a good, snug fit within this groove so milling must be with only light cuts.
The next stage is to remove some of the excess metal from each side of the block to bring it down to the desired thickness. In this case, I want the side plates to be 1/16". This is where the 4-jaw independent comes into it's own.
The block was set up in the jaws, parallel with the back face of the chuck and the sides machined off with a conventional cutting tool.
I have gripped the workpiece directly in the jaws because there is much metal to come off. If this was a finished size, I would interface some 'pads' between jaws and work to prevent it being marked.
Anyway, after both sides had been machined, time for a trial fit..
AS you see, it goes together..a nice, 'tap' fit.
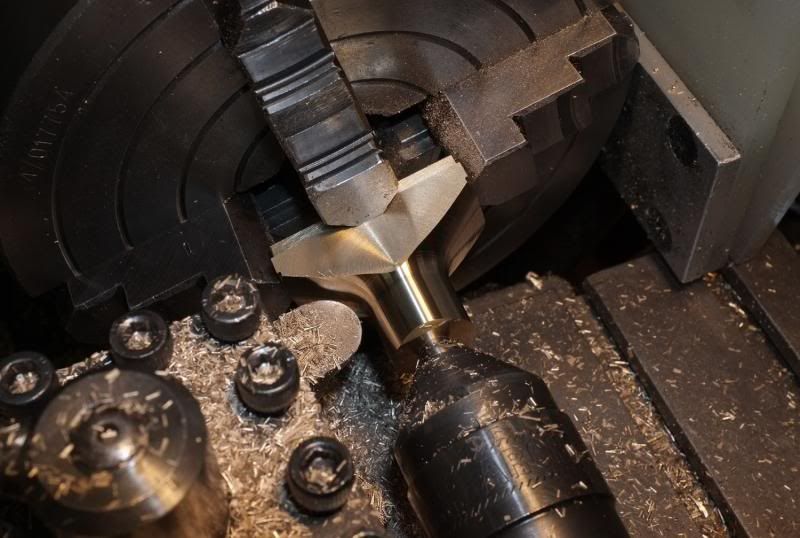
Now we have to remove the excess from the profile to produce the shape required. Because I am only gripping the job by a small amount, it was prudent to support it with a centre in the tailstock. It was then re-positioned in the chuck, 'clocked' true and roughed out firstly with the same cutting tool..
..and then finished with a piece of HSS (High Speed Steel) ground free-hand to an 8mm radius..
Next, I faced off the front, then drilled and tapped a conventional 3/8" BSF thread; also (not shown) cut a 'location' diameter in front. The reason for this is because I don't like the idea of just an unsupported thread joining net to handle and have machined a little step for the handle to locate in first.
Here are the two parts so far. They will soon be ready for soldering. The little hole in the centre of the arms is in fact an M3 thread I put in for temporary location.
Now it was time to dress up the inside of the arms with a file to be the same radius as the wood frame.
Also, by temporarily attaching both parts with an M3 screw from the bottom, I was able to file away the centre to match the arms.
The centre was now separated and some extensive filing and 1st. stage polishing done on it..
Now it was time to do a lot of heavy filing to remove most of that excess metal from the arms.
First 'blend in'...
..Then file the 'step'..
That was warm work!
Next, the two parts have to be soldered together, but before that, a little largesse with the scriber...!
Now they are soldered together.
A word about this. The solder used for joining the arms is a HARD solder and has a much higher eutectic point than that which I used for this stage, otherwise they would fall apart! For this reason, be careful with the heat source when you do this. I thoroughly cleaned and degreased both parts in thinners first, then 'pickled' and 'tinned' them with Bakers No.3 soldering fluid. The parts were tapped together and just enough heat used to melt them together-and no more! I washed the assembly in warm water afterwards to neutralize and prevent further corrosion of the Baker's fluid.
As you can see, this produces a very clean and strong joint which will remain bright.
Now you can see how it will go together with the net frame..
I'm going to leave the frame in the former for a while longer yet.
The next stage will be to glue up the strips and sand them down after. One-or two parts to be made yet though and then the handle. I already have a nice,3/4" soft-mesh, green net to go on this..
..but more next time..
Regards to all
wm+
"Are not two sparrows sold for a farthing? Yet one of them shall not fall without your Father knoweth" ..Jesus of Nazareth, King James AV
-
Marc

- Sea Trout
- Posts: 4011
- Joined: Sun Mar 10, 2013 11:14 am
- 11
- Location: Co Durham, land of the prince bishops
Re: Making a Traditional Net..of sorts.
Stunning work as ever WM+, brilliant thinking with the fish tail too.
Marc. (Prince of Durham)
“A life that partakes even a little of friendship, love, irony, humor, parenthood, literature, and music, and the chance to take part in battles for the liberation of others cannot be called 'meaningless'...”
“A life that partakes even a little of friendship, love, irony, humor, parenthood, literature, and music, and the chance to take part in battles for the liberation of others cannot be called 'meaningless'...”
-
Loop Erimder

- Wild Carp
- Posts: 9984
- Joined: Wed Apr 04, 2012 11:33 pm
- 12
- Location: Leicestershire
Re: Making a Traditional Net..of sorts.
WOW
Chance is always powerful. Let your hook be always cast; in the pool where you least expect it, there will be a fish