Making a Traditional Net..of sorts.
-
Hovis

- Tench
- Posts: 2527
- Joined: Tue Apr 02, 2013 1:54 pm
- 11
- Location: Nottingham
Re: Making a Traditional Net..of sorts.
WM+ Your skills are a constant source of inspiration to us all. What makes your projects special is the fact the items are crafted, anybody can go out and buy expensive items but to reuse/recycle and produce items like this is simply mind boggling.
I have laid aside business, and gone a'fishing.
Izaak Walton
Izaak Walton
-
Barbulus

- Tench
- Posts: 2509
- Joined: Sun Aug 25, 2013 1:51 pm
- 10
Re: Making a Traditional Net..of sorts.
I really enjoyed this post....quite superb craftsmanship.....absolutely stunning....but I really had to smile and splutter over the morning coffee at the most remarkable phrase from Mr Watermole in this post.............and I quote....
..."...For this reason, be careful with the heat source when you do this"....
In all sincerity, the chances of "moi" actually "doing this" is less than zero. I can "dunk" some off-cut of garden cane in a pot of varnish and think I am doing well but to see the skill of young Mr Watermole in actually taking a block of brass and milling the most beautiful creation for a simply outstanding net is breathtaking......superb.....thankyou for sharing your skill.
-
Northern_Nomad

- Arctic Char
- Posts: 1667
- Joined: Wed Nov 27, 2013 8:10 pm
- 10
- Location: Wales
Re: Making a Traditional Net..of sorts.
When engineering skills meet artistic skills that's when you get something special.
That is an example at its best.
That is an example at its best.
"We knelt side by side looking at it. I knew it was big, and suddenly it dawned on me it was more than that. It was tremendous!" - Richard Walker
-
MGs

- Pike
- Posts: 6417
- Joined: Wed Nov 02, 2011 2:24 pm
- 12
- Location: Cornwall
Re: Making a Traditional Net..of sorts.
Very nice indeed
Old car owners never die....they just rust away
-
Wallys-Cast

- Pike
- Posts: 6603
- Joined: Tue Mar 20, 2012 11:02 am
- 12
- Location: Durham.
Re: Making a Traditional Net..of sorts.
That spreader block is a thing of real beauty, it reminds me of an art-deco car mascot from the 30s..
I think this net is going to be more like something the ancient greeks would have had made as an offering to the gods.
Wal.
I think this net is going to be more like something the ancient greeks would have had made as an offering to the gods.
Wal.
-
Watermole+

- Chub
- Posts: 1051
- Joined: Thu Mar 15, 2012 11:07 pm
- 12
- Location: Devon & Cornwall border
Re: Making a Traditional Net..of sorts.
Part 5.
..Can it really be 2nd March since the last part was posted on this project?? Sometimes I just don't know where the time goes.
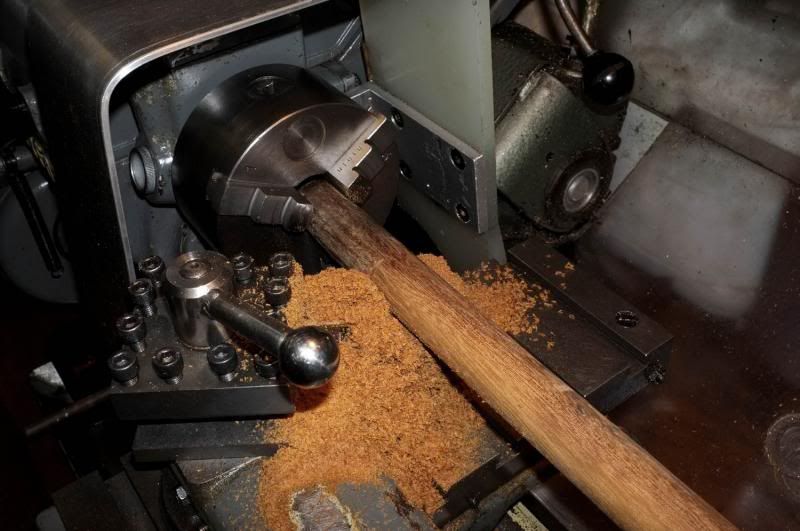
Apologies for keeping you waiting so long but have had to shelve this for a while. However.. I have at long last finished the net head so at least you can see something completed. I think I will make the handle from Greenheart, having acquired a couple of lengths for a reasonable sum, but the problem is turning it on a little lathe with only a small internal spindle diameter and limited travel. I have made one-or two experiments with this as you will see later..
In Part 4, the wood strips which will make up the net frame were awaiting the glue stage and after fixing the two innermost ones, had a bit of an idea. Judging from other members nets, it seems that where the ends of the frame are attached to the yoke, can be a bit of a weak spot so taking this lesson on board, thought we might strengthen it up a bit here and adding a bit of decoration at the same time..?
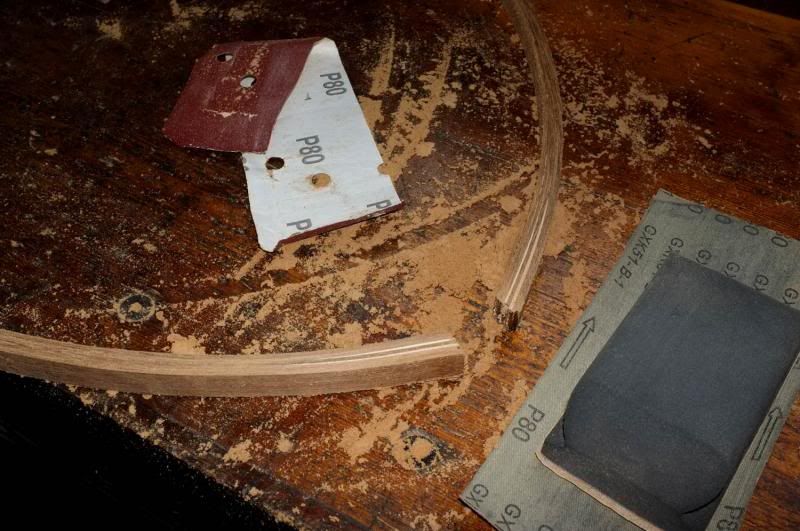
I have a pack of flat, white hardwood strips (probably ramin) bought from a handicraft shop, which I generally use for stirring paint and suchlike. they are about 1mm thick, 20mm wide and radiused at both ends. I cut one of the ends off a few of these..

Before we go any further, you may notice a modification to the net former, viz. a removable section where the ends join. I found that, by having a dummy run at fixing the yoke, it was far, far easier to access it from the inside, whilst the end clamp maintained the shape and both ends in position..
Anyway, back to the strips. I wanted to taper these down to almost nothing in thickness and achieved this by firstly fixing the 'waste' end to a block of wood with a drawing pin and then by going steady and always working away from the pin, it was possible to sand the strip down to a taper..

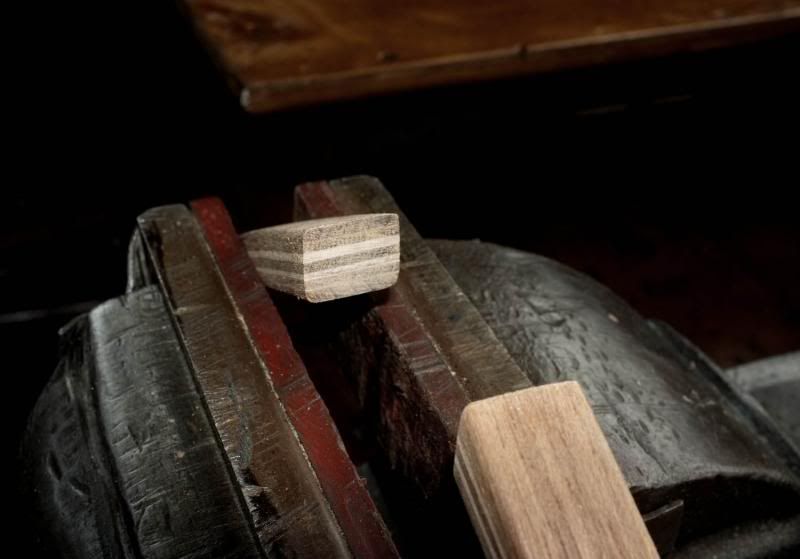
We have moved forward a bit now. All the strips which make up the net frame have been successfully glued together and by sandwiching and gluing the whitewood sections between the middle strips,we have with only a little effort, increased the thickness and strength where it has to be screwed-and added a little decorative work at the same time!
Here, I am sanding down everything together to achieve the desired thickness and putting a radius on all the edges of the frame. Now the frame is free from the former, note that by allowing it to thoroughly dry out first, it has held its' shape well and only expanded outwards about an inch or so, which will be no problem to close up.
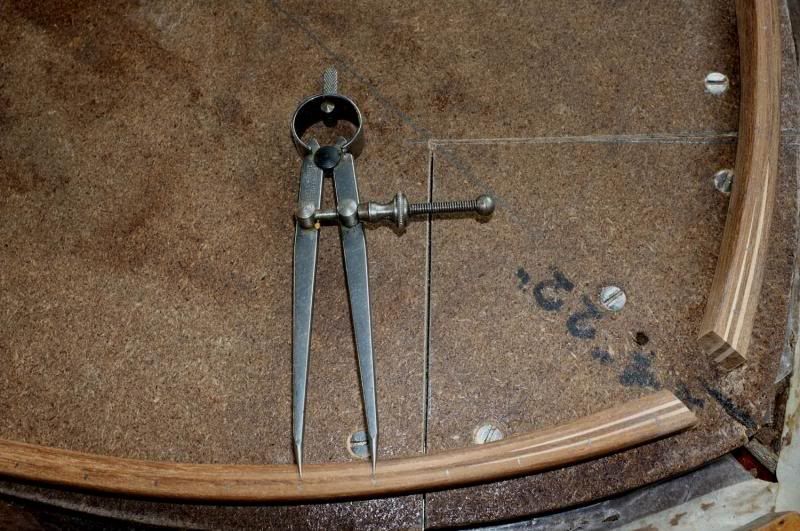
The ends now need a little accurate sanding so that they will look nice and flush when joined together by the yoke..
If you are also doing this, it is worthwhile taking your time because the end result will be that much more pleasing to the eye.
The next step is to drill the holes for the net to be fitted. ai don't know how you professionals do this but I just counted the number of mesh links on the top row of the net-76 in this case-and divided up the inside of the frame accordingly..
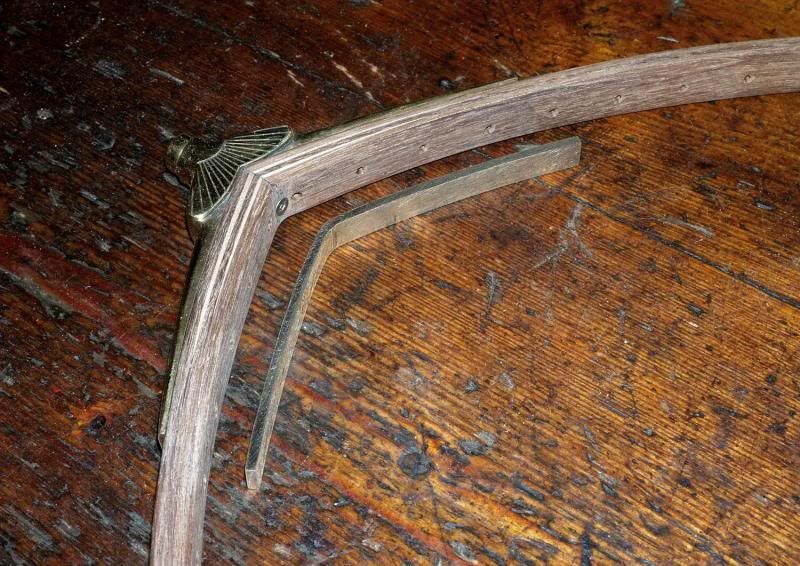
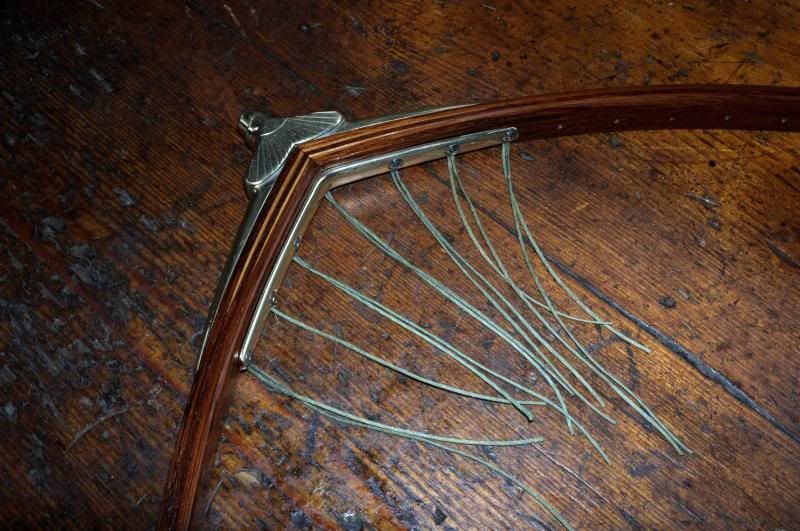
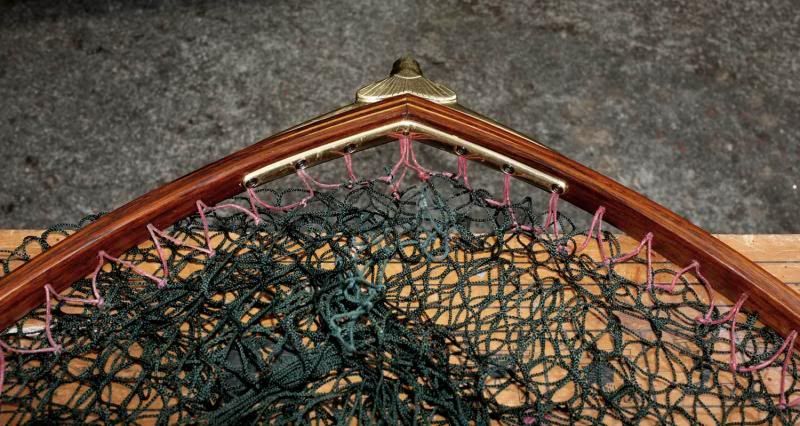
The next thing was to make a brass fixing strip to the inside of the frame, which serves as a washer and also holds everything nicely in place. I'm sorry there are no pictures of making this but this is the second attempt, the first went wrong and was scrapped! To recap though, I heated and bent a piece of 3/8" x 1/8" brass to the approximate shape, then got to work with a file. The inside radii were matched first, then the outsides were blended in and sanded down with emery cloth. The holes were not drilled at this stage because I wanted to see where they would go, to fit in with the other hole spacings. The little screw in the middle of where the wood ends join, is only temporary to check the fitting.
This is much later in the project.
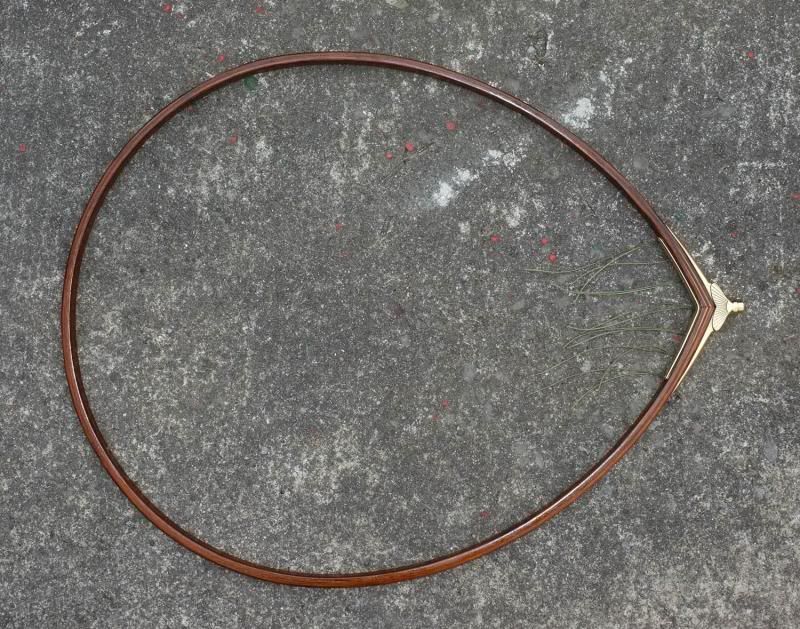
Now that the frame holes have been drilled, I finished the frame by dressing with raw linseed oil, allowing a few days between applications to let it soak in well and then polishing vigorously with cotton waste. The finish is soft at first, but becomes much better in time-and is fully water proof. It can of course, always be refreshed periodically to maintain finish.
The inside washer strip has also been shaped up and the fixing holes put in. This was easy to do when the frame was held in the former and the former section removed. I decided against woodscrews for fixing; instead, drilled and countersunk the washer to accept some M3 stainless machine screws, the heads having been modified on the lathe and then heat treated. The corresponding holes have been put in the yoke arms and these were tapped M3 thread. The arms were then thinned down and shaped up with free-hand filing.
The net 'hanger' cord is held between the washer strip and the net frame for neatness. I have relief-countersunk the inside of the holes and filed small channels so that the cord is not trapped and cut. The pieces of green cord are just to test and prove that they will not be severed when the machine screws are tightened.
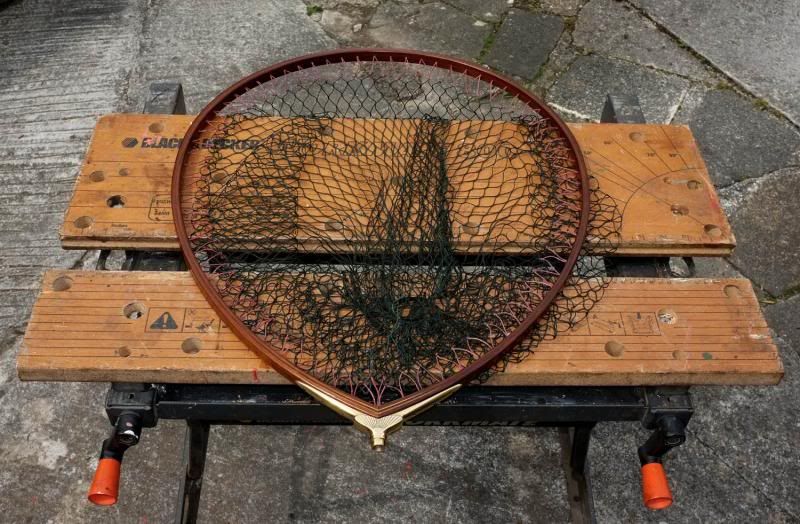
This shows the final net shape.
The net to be fitted is a 3/4", dark green soft-mesh type, which unfortunately had no hanger cord attached!!
I made up a little board to do this, with small panel pins tapped in at the correct spacing and pitch of the net mesh. The top row of pins are to give an even length to the hangers. The cord was very traditional! It was a hank of genuine sea-fishing line from about 1930. I tested it first for strength and stitched it to the net..
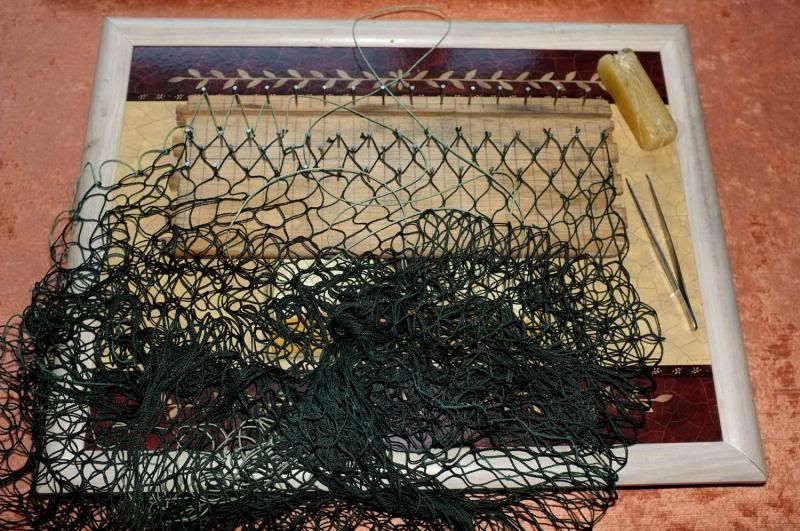
That was the first go. After hours of fun tying all this in, found it to be far from satisfactory. I hadn't got all the hangers the same length, underestimated the length of cord needed, hadn't waxed the cord first and didn't like the colour anyway!
This was put right on the second go. I coloured the cord by drawing it through a brick-red, permanent marker pen, then well waxed it with proper beeswax..

You complete one row, then lift it off and move it along to the left hand pin and start again until you have gone around. It didn't actually take that long once you have the 'hang' of it. The only improvement-and one which would speed up this process-is to make a proper wooden needle to store the cord on.
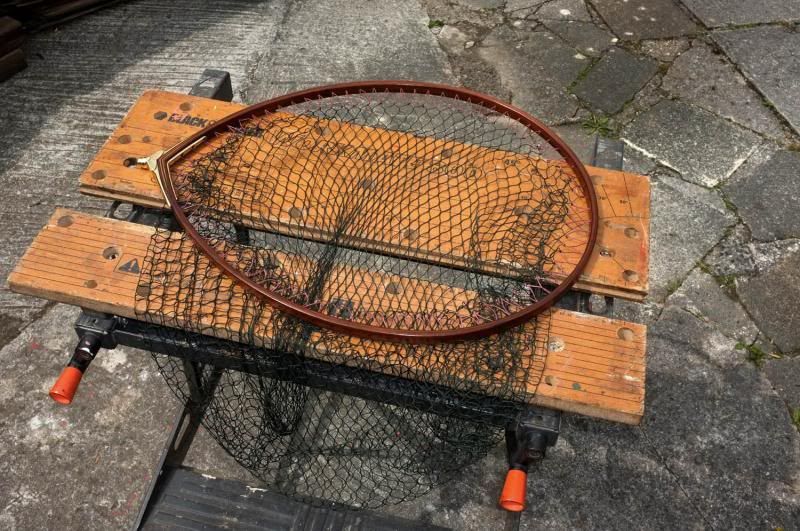
Anyway, the job was done so here are a couple of photos of the finished net head; the handle and fittings will follow later.
The project started life here on the 'Workmate' and so this is where this part ends..
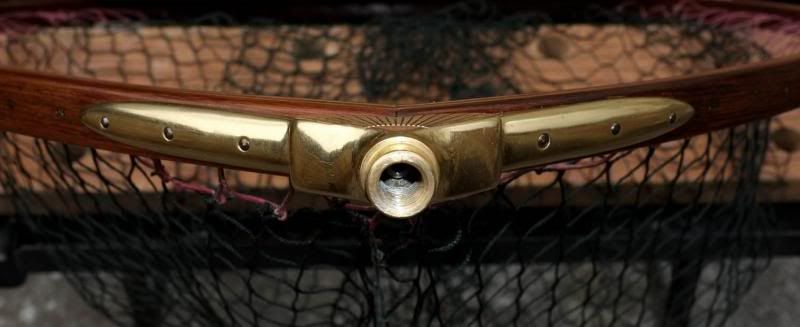
This is the fixing detail; it is tapped 3/8" x 20TPI (BSF) and I will add a piece of studding later for attachment.
I have started turning my pieces of Greenheart; here is the lathe being pushed to its' limit-and making a lot of mess!
More next time..
wm+
..Can it really be 2nd March since the last part was posted on this project?? Sometimes I just don't know where the time goes.
Apologies for keeping you waiting so long but have had to shelve this for a while. However.. I have at long last finished the net head so at least you can see something completed. I think I will make the handle from Greenheart, having acquired a couple of lengths for a reasonable sum, but the problem is turning it on a little lathe with only a small internal spindle diameter and limited travel. I have made one-or two experiments with this as you will see later..
In Part 4, the wood strips which will make up the net frame were awaiting the glue stage and after fixing the two innermost ones, had a bit of an idea. Judging from other members nets, it seems that where the ends of the frame are attached to the yoke, can be a bit of a weak spot so taking this lesson on board, thought we might strengthen it up a bit here and adding a bit of decoration at the same time..?
I have a pack of flat, white hardwood strips (probably ramin) bought from a handicraft shop, which I generally use for stirring paint and suchlike. they are about 1mm thick, 20mm wide and radiused at both ends. I cut one of the ends off a few of these..
Before we go any further, you may notice a modification to the net former, viz. a removable section where the ends join. I found that, by having a dummy run at fixing the yoke, it was far, far easier to access it from the inside, whilst the end clamp maintained the shape and both ends in position..
Anyway, back to the strips. I wanted to taper these down to almost nothing in thickness and achieved this by firstly fixing the 'waste' end to a block of wood with a drawing pin and then by going steady and always working away from the pin, it was possible to sand the strip down to a taper..
We have moved forward a bit now. All the strips which make up the net frame have been successfully glued together and by sandwiching and gluing the whitewood sections between the middle strips,we have with only a little effort, increased the thickness and strength where it has to be screwed-and added a little decorative work at the same time!
Here, I am sanding down everything together to achieve the desired thickness and putting a radius on all the edges of the frame. Now the frame is free from the former, note that by allowing it to thoroughly dry out first, it has held its' shape well and only expanded outwards about an inch or so, which will be no problem to close up.
The ends now need a little accurate sanding so that they will look nice and flush when joined together by the yoke..
If you are also doing this, it is worthwhile taking your time because the end result will be that much more pleasing to the eye.
The next step is to drill the holes for the net to be fitted. ai don't know how you professionals do this but I just counted the number of mesh links on the top row of the net-76 in this case-and divided up the inside of the frame accordingly..
The next thing was to make a brass fixing strip to the inside of the frame, which serves as a washer and also holds everything nicely in place. I'm sorry there are no pictures of making this but this is the second attempt, the first went wrong and was scrapped! To recap though, I heated and bent a piece of 3/8" x 1/8" brass to the approximate shape, then got to work with a file. The inside radii were matched first, then the outsides were blended in and sanded down with emery cloth. The holes were not drilled at this stage because I wanted to see where they would go, to fit in with the other hole spacings. The little screw in the middle of where the wood ends join, is only temporary to check the fitting.
This is much later in the project.
Now that the frame holes have been drilled, I finished the frame by dressing with raw linseed oil, allowing a few days between applications to let it soak in well and then polishing vigorously with cotton waste. The finish is soft at first, but becomes much better in time-and is fully water proof. It can of course, always be refreshed periodically to maintain finish.
The inside washer strip has also been shaped up and the fixing holes put in. This was easy to do when the frame was held in the former and the former section removed. I decided against woodscrews for fixing; instead, drilled and countersunk the washer to accept some M3 stainless machine screws, the heads having been modified on the lathe and then heat treated. The corresponding holes have been put in the yoke arms and these were tapped M3 thread. The arms were then thinned down and shaped up with free-hand filing.
The net 'hanger' cord is held between the washer strip and the net frame for neatness. I have relief-countersunk the inside of the holes and filed small channels so that the cord is not trapped and cut. The pieces of green cord are just to test and prove that they will not be severed when the machine screws are tightened.
This shows the final net shape.
The net to be fitted is a 3/4", dark green soft-mesh type, which unfortunately had no hanger cord attached!!
I made up a little board to do this, with small panel pins tapped in at the correct spacing and pitch of the net mesh. The top row of pins are to give an even length to the hangers. The cord was very traditional! It was a hank of genuine sea-fishing line from about 1930. I tested it first for strength and stitched it to the net..
That was the first go. After hours of fun tying all this in, found it to be far from satisfactory. I hadn't got all the hangers the same length, underestimated the length of cord needed, hadn't waxed the cord first and didn't like the colour anyway!
This was put right on the second go. I coloured the cord by drawing it through a brick-red, permanent marker pen, then well waxed it with proper beeswax..
You complete one row, then lift it off and move it along to the left hand pin and start again until you have gone around. It didn't actually take that long once you have the 'hang' of it. The only improvement-and one which would speed up this process-is to make a proper wooden needle to store the cord on.
Anyway, the job was done so here are a couple of photos of the finished net head; the handle and fittings will follow later.
The project started life here on the 'Workmate' and so this is where this part ends..
This is the fixing detail; it is tapped 3/8" x 20TPI (BSF) and I will add a piece of studding later for attachment.
I have started turning my pieces of Greenheart; here is the lathe being pushed to its' limit-and making a lot of mess!
More next time..
wm+
"Are not two sparrows sold for a farthing? Yet one of them shall not fall without your Father knoweth" ..Jesus of Nazareth, King James AV
-
Loop Erimder

- Wild Carp
- Posts: 9984
- Joined: Wed Apr 04, 2012 11:33 pm
- 12
- Location: Leicestershire
Re: Making a Traditional Net..of sorts.
That is a very sexy landing net 
Chance is always powerful. Let your hook be always cast; in the pool where you least expect it, there will be a fish
-
GarryProcter

- Arctic Char
- Posts: 1897
- Joined: Sun Apr 29, 2012 12:48 pm
- 11
- Location: Wilt Shire
Re: Making a Traditional Net..of sorts.
Magnificent, wm+
-
Barbulus
- Tench
- Posts: 2509
- Joined: Sun Aug 25, 2013 1:51 pm
- 10
Re: Making a Traditional Net..of sorts.
Is there a better word than "magnificent" ? If there is then this net is exactly that. Marvellous !
-
Kevanf1

- Arctic Char
- Posts: 1563
- Joined: Sat Oct 06, 2012 2:22 pm
- 11
- Location: Cheslyn Hay, Staffordshire
Re: Making a Traditional Net..of sorts.
You know what? It's my 52nd birthday this coming Friday.... I know exactly what I would I would love to receive for it 
Currently reading......Go Fishing For Bass and Go Fishing For Skate and Rays both by Graeme Pullen, The Kill Switch by James Rollins, Raspberry Pi Manual - Haynes, 'Make: Electronics by Charles Platt' & the 'Myford series 7 manual by Ian Bradley'